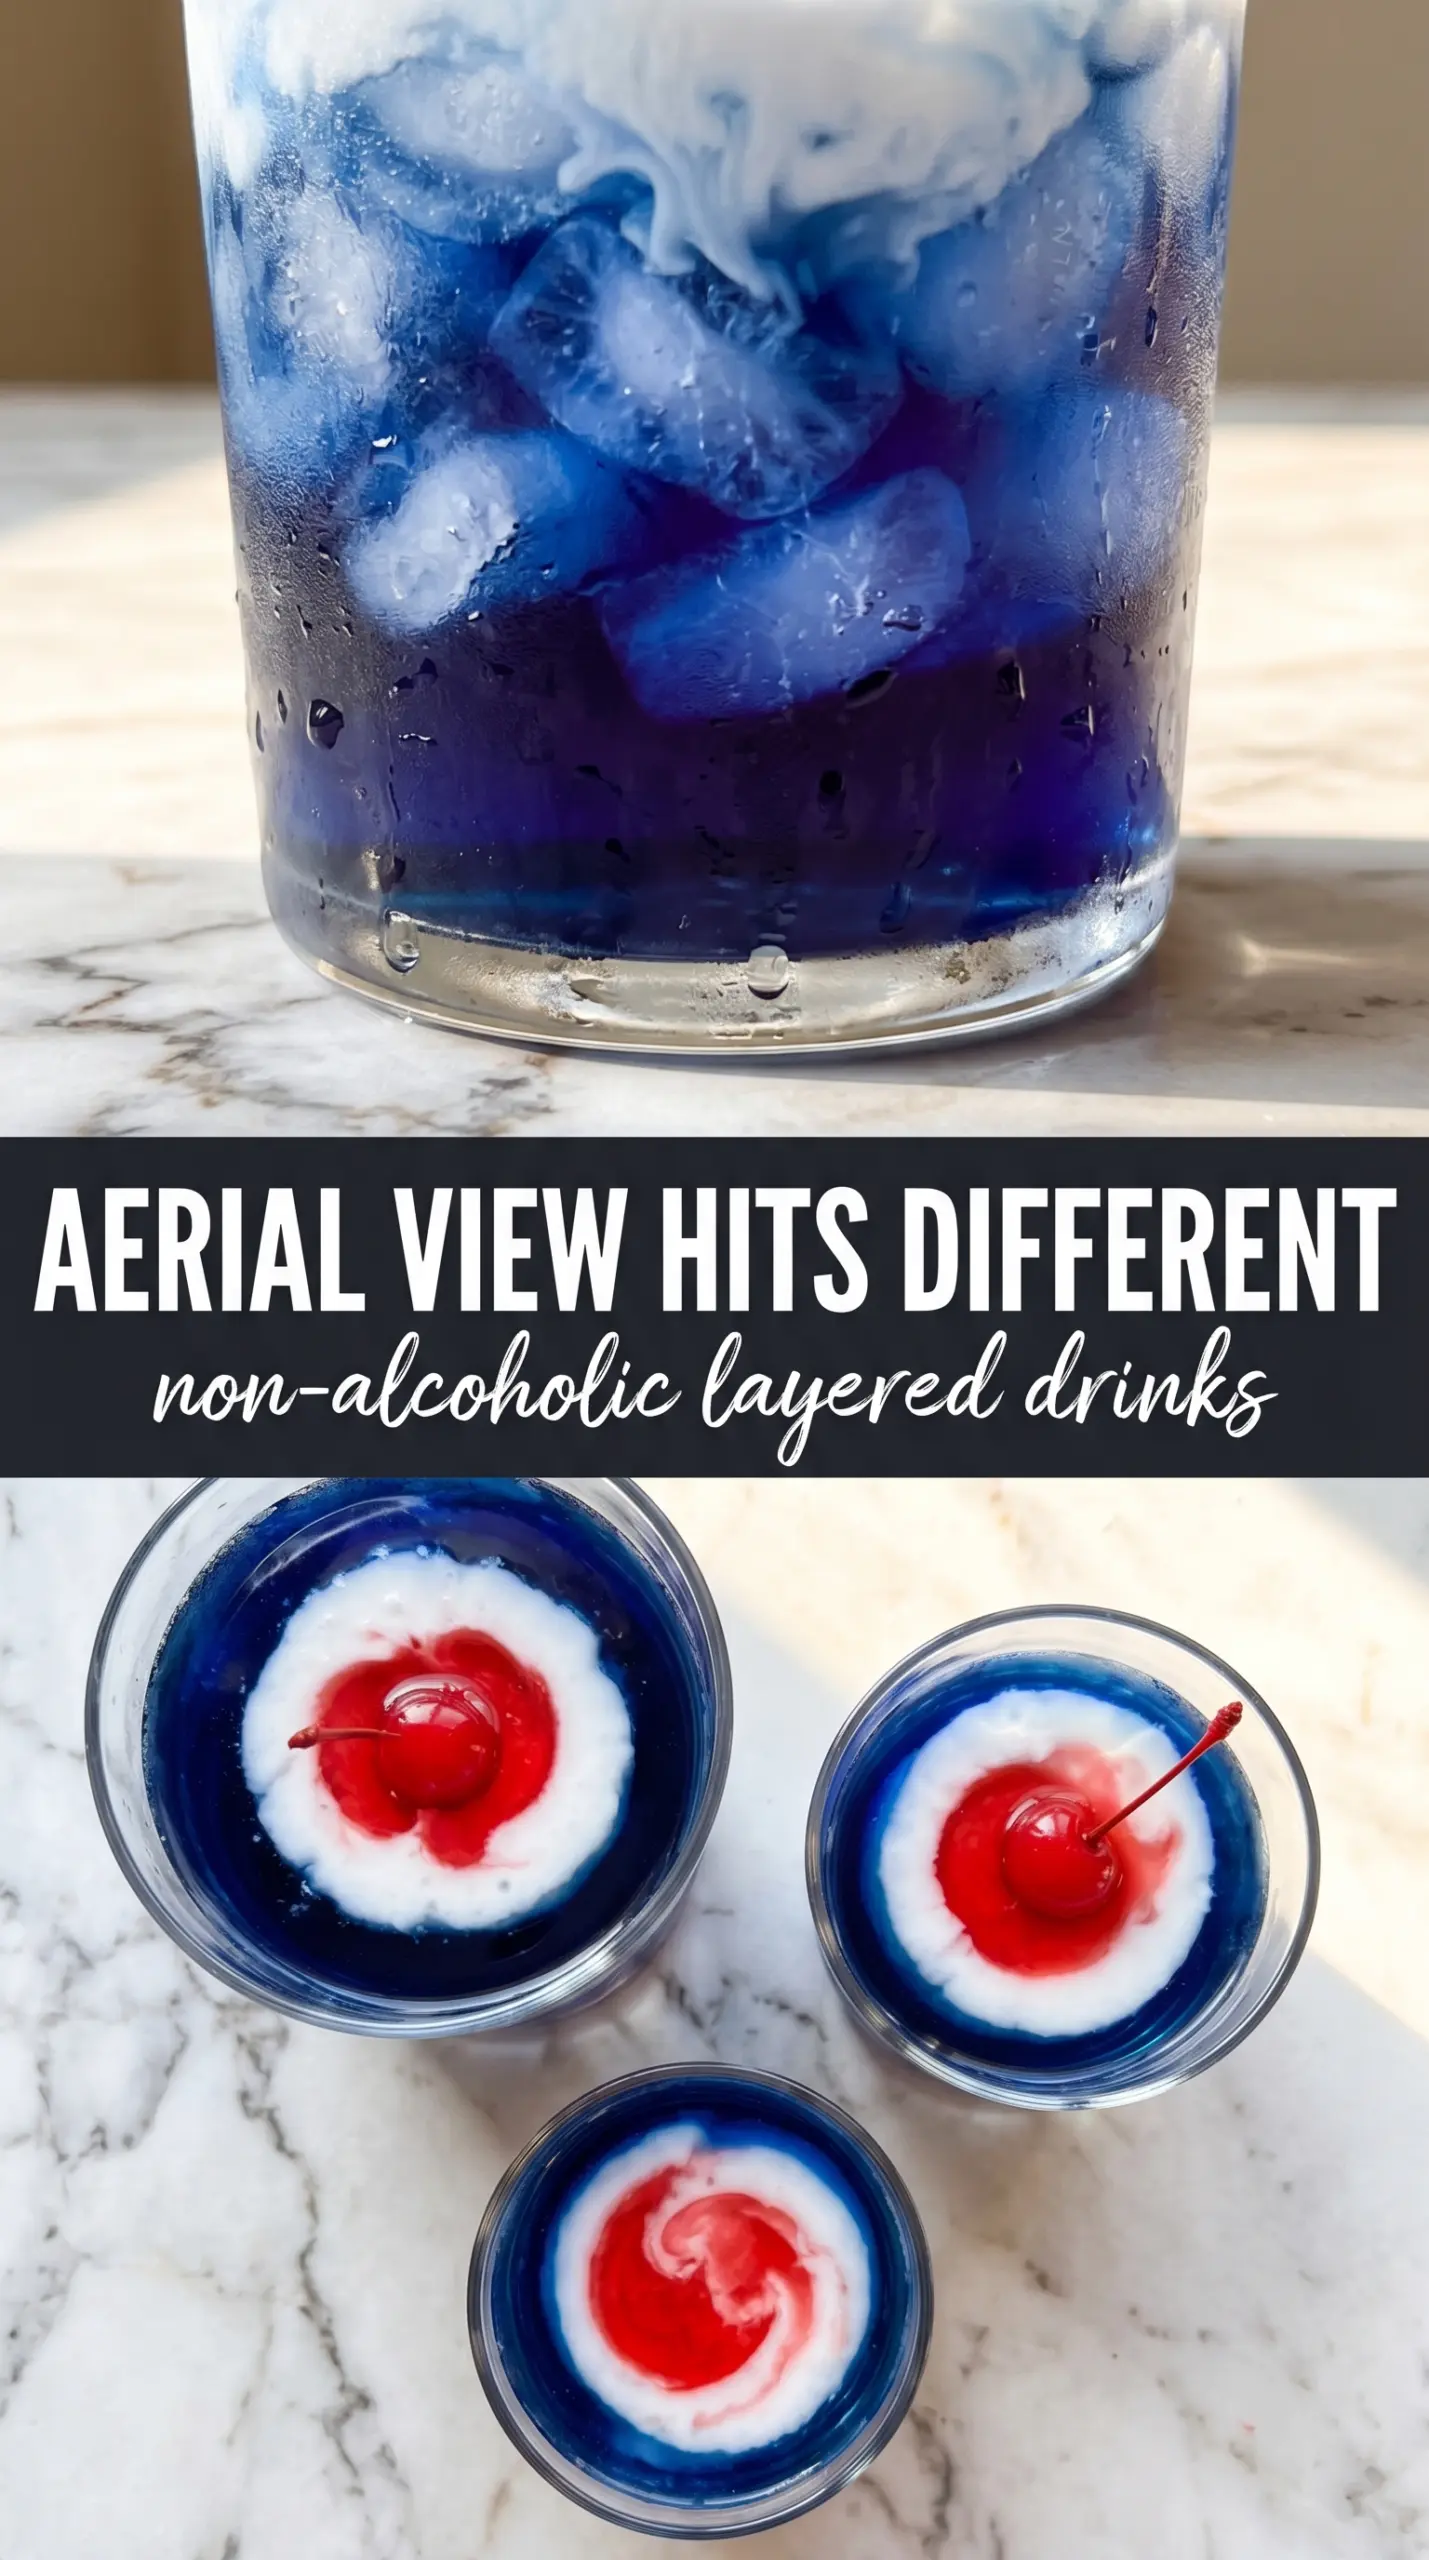
Non-alcoholic layered drinks are all about the reveal: three bright, separate bands that look like you spent way more effort than you did. When the grenadine settles into the bottom, the lemonade holds in the middle, and the blue raspberry floats on top, you get a glass that feels party-ready before anyone takes a sip. The flavor is sweet-tart and playful, but the real payoff is the clean layers that hold long enough to carry the drink from kitchen to table.
The trick is in the temperature and the pour. Everything except the ice should be chilled, because cold liquids are a little denser and less likely to blur together. Pouring over the back of a spoon slows the stream just enough to keep each layer from punching through the one below it. That little bit of control is what keeps this from turning into a red-and-blue muddle.
Below, I’ve included the small details that matter most: which ingredient can be swapped without losing the look, how to keep the layers crisp, and what to do if you need to make a few glasses for a crowd.
The layers stayed sharp for the whole birthday party, and the spoon trick made the lemonade sit right on top of the grenadine without mixing.
Like these layered mocktails? Save them to Pinterest for the next party when you want a colorful drink that stacks cleanly in the glass.
The Pour Order That Keeps the Layers Clean
The biggest mistake with layered drinks is pouring too fast and expecting the colors to separate on their own. They won’t. Grenadine is heavy, so it belongs on the bottom, but the middle and top layers still need a gentle hand or they’ll cut straight through and blur the whole glass.
Cold ingredients help, but the real control comes from moving slowly and keeping the liquid stream narrow. The spoon method works because it breaks the pour enough that the drink lands softly instead of crashing in. If the top layer starts mixing, the glass usually has too much ice movement or the liquid was dumped in all at once.
What Each Ingredient Is Actually Doing in This Recipe
- Primary ingredient (the star) — Quality matters most. Choose the best you can find.
- Cooking medium (oil, butter, or broth) — This carries flavors and prevents dryness.
- Seasonings (salt, pepper, spices, herbs) — Layer flavors so nothing overpowers. Build depth gradually.
- Aromatics (garlic, onion, herbs) — Cook with fat to bloom flavors. Become the foundation.
- Supporting ingredients — Complement the main ingredient without overpowering it.
- Sauce or liquid (if applicable) — Brings flavors together. Balance richness with acid.
- Acid (lemon, vinegar, wine, or other) — Brightens and prevents flat-tasting results.
- Final finish (garnish, glaze, or sauce) — Prevents one-dimensional taste and adds visual appeal.
What Each Ingredient Is Doing in the Glass
- Grenadine syrup — This gives you the deepest red layer and the heaviest base. Real grenadine is worth using here because its density is what makes the bottom layer stay put. If you use a thinner cherry syrup, it may still taste good, but it won’t stack as cleanly.
- Lemonade — Chilled lemonade sits nicely in the middle and adds the tart edge that keeps the drink from tasting flatly sweet. Freshly mixed or bottled both work, but it needs to be cold so it doesn’t loosen the grenadine layer underneath.
- Blue raspberry sports drink or blue raspberry lemonade — This is the top layer and the color that makes the drink dramatic. Pick the version that’s brightest and lightest in body; a heavier syrupy drink is more likely to sink or streak.
- Ice cubes — Ice isn’t just for temperature. It gives the syrup something to slide around and settle against, which helps separate the layers. Fill the glass close to the top so the pour has less distance to travel.
- Maraschino cherries and striped straws — These don’t change the structure, but they finish the drink in a way that makes the colors pop even more. Add them at the end so you don’t disturb the layers while garnishing.
Building the Glass Without Disturbing the Color Bands
Start With a Tight Bed of Ice
Fill a tall clear glass almost to the top with ice cubes. The ice should pack in tightly enough that the liquids don’t crash straight to the bottom, but not so tightly that you can’t pour between the cubes. If the glass is only half full, the layers will mix more easily because there’s too much open space for the liquid to fall through.
Lay Down the Grenadine First
Pour the grenadine slowly over the ice and let it sink. You’ll see it collect at the bottom right away, which is exactly what you want. If it spreads into the ice instead of pooling, the pour was too fast or the glass wasn’t cold enough to help the syrup settle.
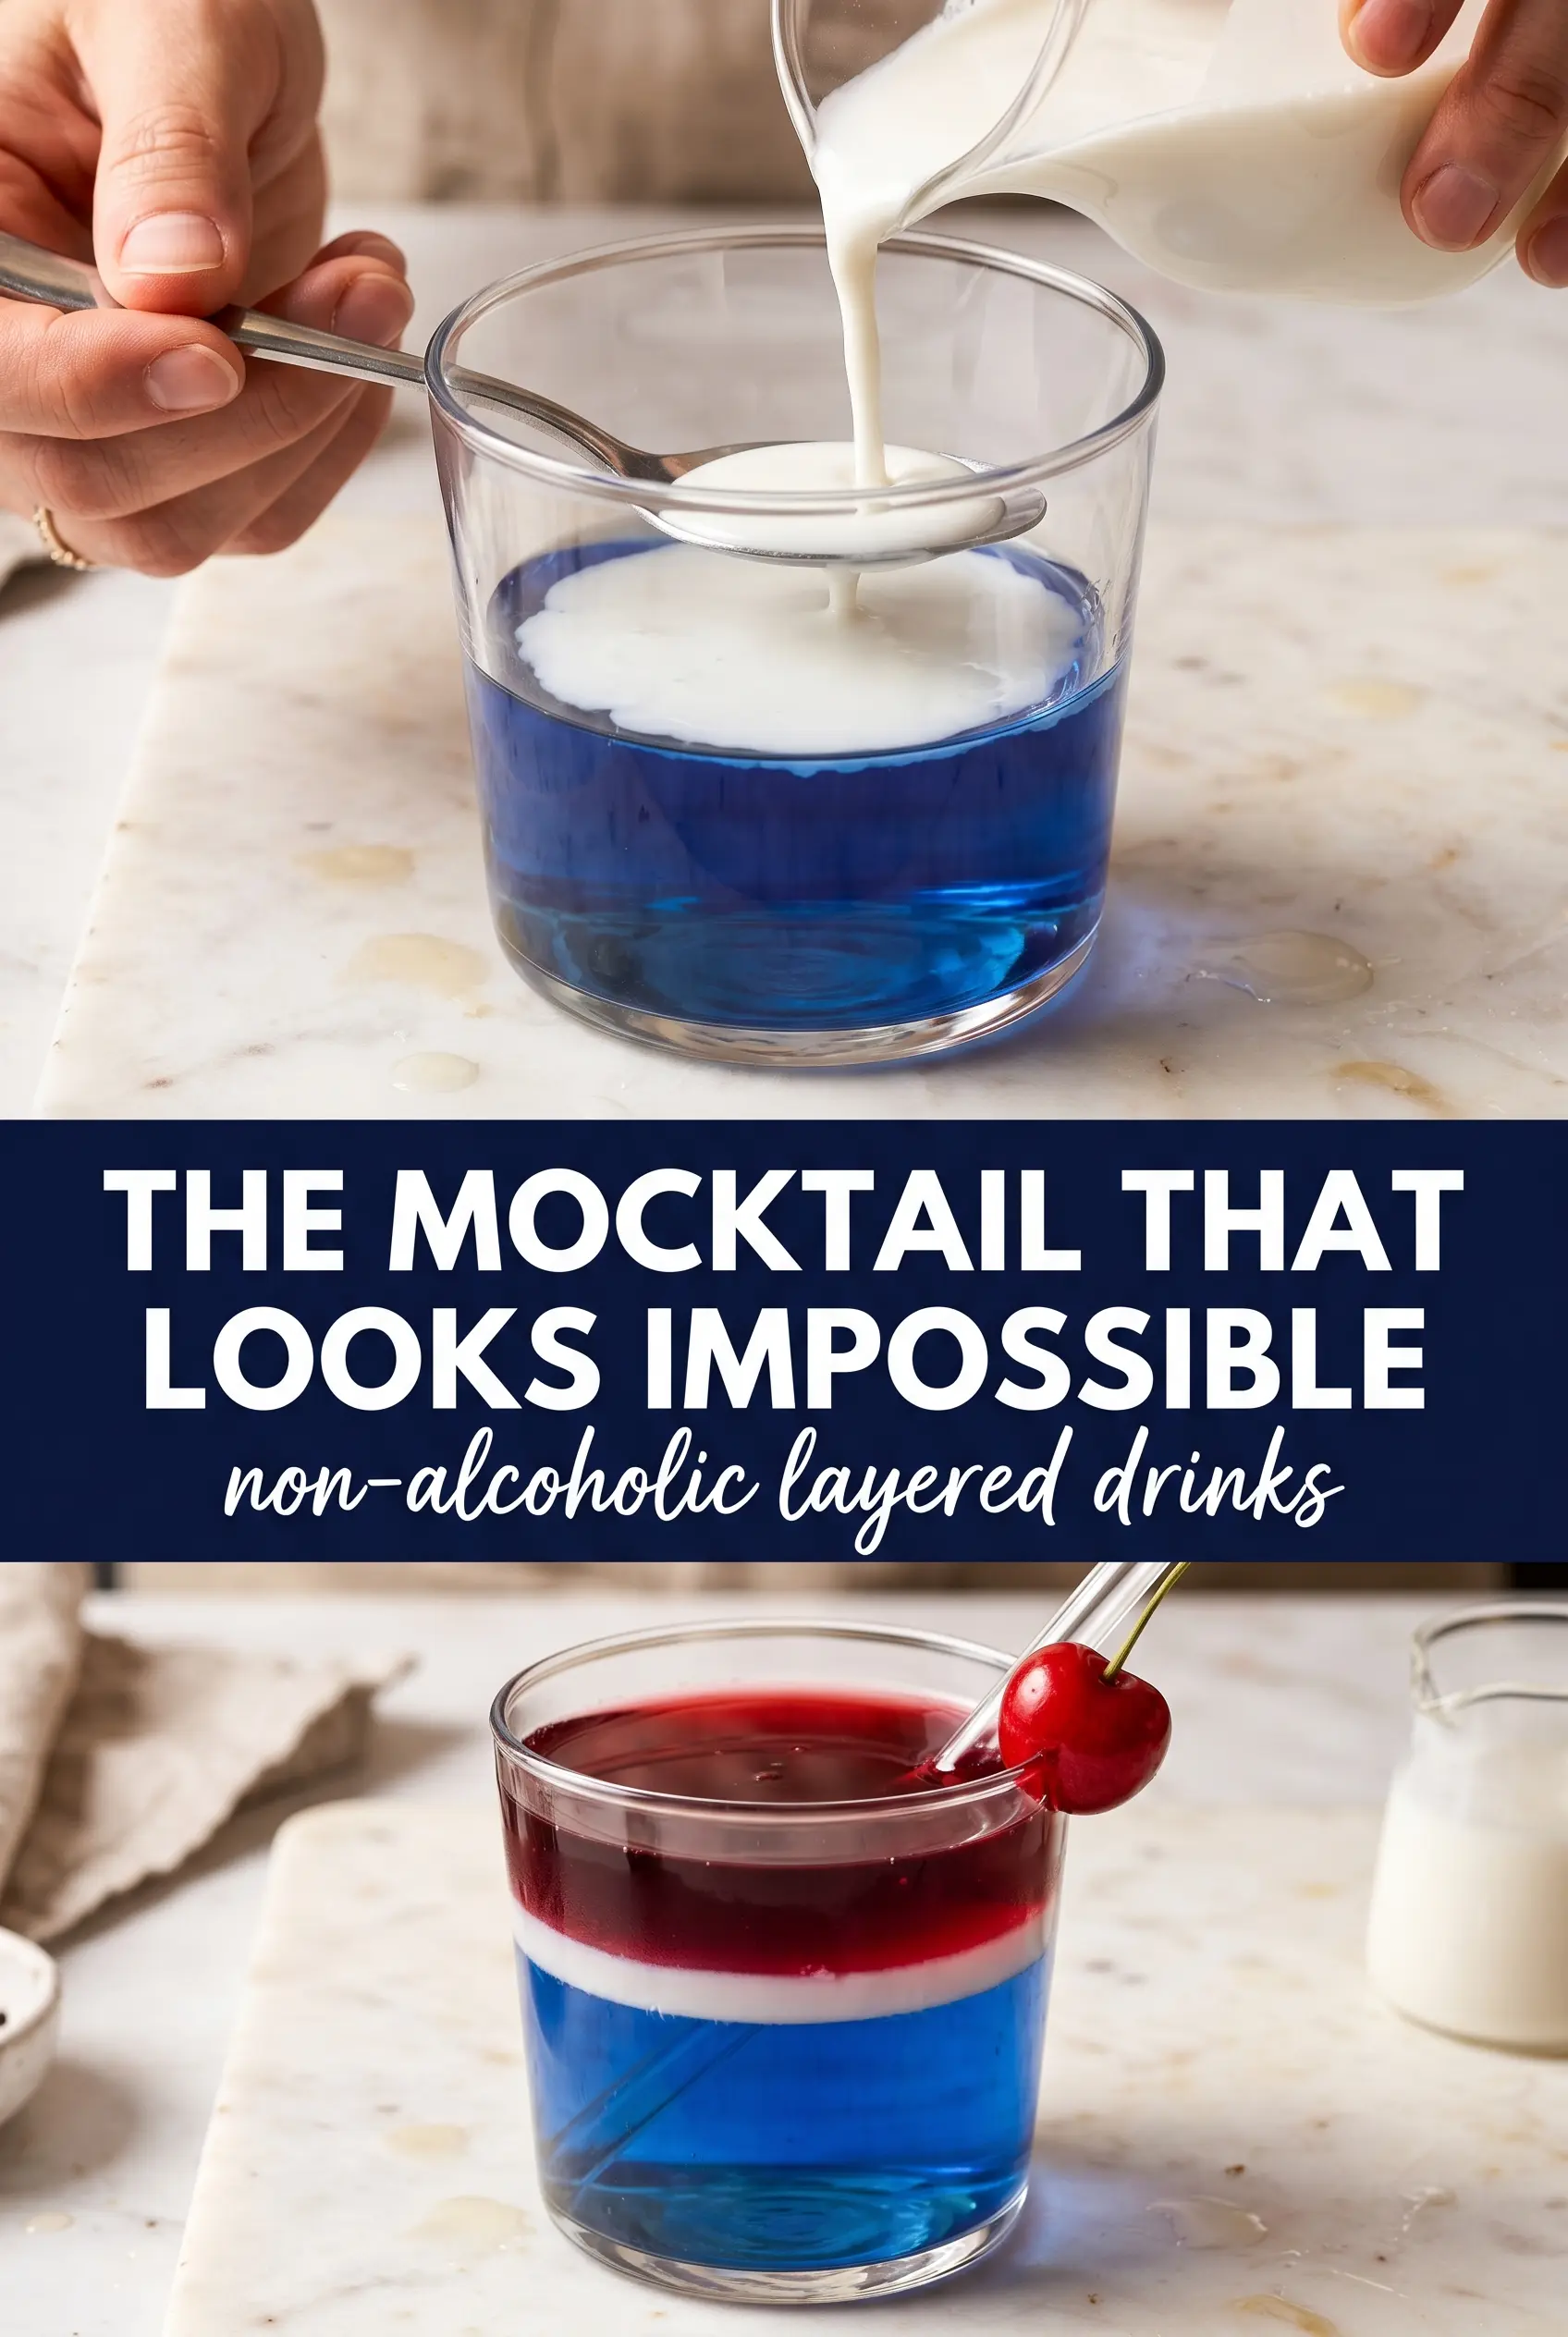
Float the Middle and Top Layers
Set a spoon just above the ice and pour the lemonade over the back of it in a thin stream. Repeat the same method with the blue raspberry drink for the top layer. The spoon slows the liquid enough to protect the line between colors; if the layers start to blend, pause and let the glass settle before adding more.
Finish and Serve Right Away
Top with a maraschino cherry and a striped straw, then serve immediately without stirring. This drink is at its prettiest in the first few minutes, before the ice starts melting and softening the edges between layers. If you need to carry it to a party table, hold the glass steady and keep it upright so the colors stay defined.
How to Adapt These Layered Mocktails for Different Crowds
Make It Less Sweet
Use a tart lemonade and a blue raspberry drink that leans more citrus than candy-sweet. The colors will still layer, but the drink tastes sharper and more balanced. This works well if you want the look without the syrupy finish.
Use Different Blue or Red Layers
Any dense red syrup and any bright blue beverage can work as long as the textures are different enough to separate. Cherry syrup, raspberry syrup, or a pomegranate-style syrup can replace grenadine, while a blue sports drink can replace blue raspberry lemonade. The look changes slightly, but the stacking method stays the same.
Make It Gluten-Free and Dairy-Free
This drink is naturally gluten-free and dairy-free as written, so there’s nothing to fix unless you change the ingredients. Just check the labels on the lemonade and sports drink if you’re serving someone with strict dietary needs, because the layer effect depends on packaged drinks that can vary by brand.
Batch the Components for a Crowd
You can chill all three liquids ahead of time and line up the glasses with ice before guests arrive. Don’t combine the layers in a pitcher if you want the visual effect; the whole point is the separate stack in each glass. For a party, keep the bottles cold and build each drink to order so the colors stay sharp.
Serving and Make-Ahead Notes
- Prep ahead: Chill all ingredients several hours in advance and keep the garnishes ready, but build the drinks at the last minute.
- Best for serving: A tall clear glass shows off the layers best, especially with a side-angle view and a striped straw.
- Leftovers: The layers will mix as the ice melts, so this drink doesn’t hold well once assembled. If you have extra liquids, keep them chilled and remake fresh glasses when needed.
Questions I Get Asked About This Recipe
Non-Alcoholic Layered Drinks (Virgin Layered Mocktail)
Ingredients
Method
- Fill a tall clear glass with ice cubes almost to the top (leave about 1/2 inch of space). The glass should look full of ice with a clear surface above it.
- Pour grenadine syrup slowly over the ice so it sinks to the bottom as the first layer. Pour steadily and stop as soon as you’ve covered the ice surface with syrup.
- Gently pour the chilled lemonade over the back of a spoon held just above the ice to create a clean middle layer. Watch for a distinct golden layer forming without breaking the red layer.
- Pour the blue raspberry drink over the spoon in the same way to float it as the top layer. Stop when the top layer reaches the top rim and stays visibly separate.
- Garnish with a maraschino cherry and a striped straw and serve immediately without stirring. Keep the drink undisturbed so the jewel-toned layers remain stacked.