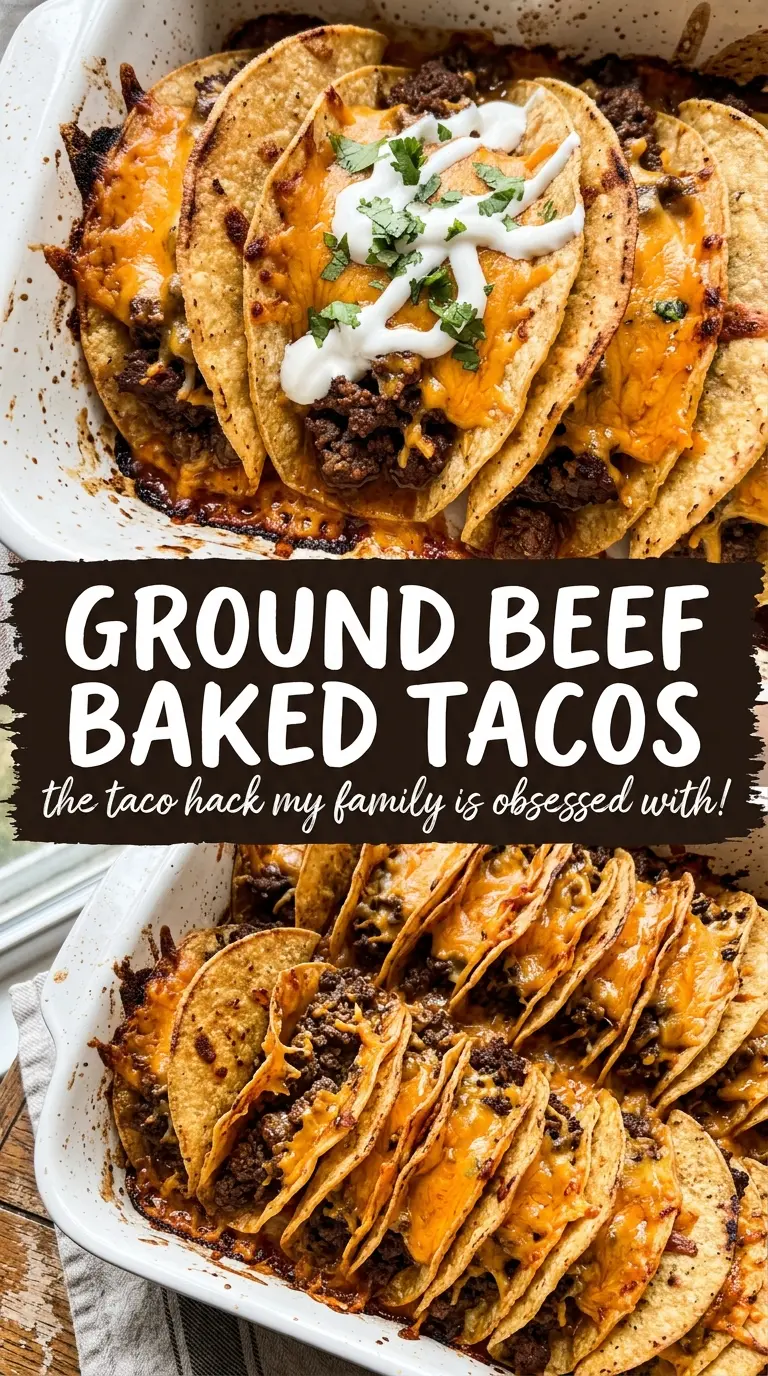
Crispy baked taco shells with seasoned ground beef and melted cheddar hit the table looking like you put in more effort than you did. The oven finishes what the skillet starts: the shells stay crunchy, the cheese melts into the beef, and every taco holds together better than the usual build-at-the-counter version.
The key is keeping the beef filling on the drier side before it goes into the shells. If it’s soupy, the bottoms soften and the tacos lose that clean crack when you bite in. Baking them upright also matters because it lets the cheese melt across the top without tipping everything into a mess.
Below, I’ve included the little details that keep the shells crisp, plus a few smart swaps for when you want to change up the toppings or stretch the filling a little farther.
The shells stayed crisp in the oven and the cheese melted right over the beef without making everything soggy. My kids grabbed their own toppings and there wasn’t a taco left.
Craving crispy Ground Beef Baked Tacos with melty cheese? Save this one for the easiest weeknight taco night.
The Crunch Factor: Why the Filling Has to Be Tight Before It Hits the Oven
Baked tacos only work when the filling behaves. If the beef mixture is loose or watery, steam softens the shells before the cheese has a chance to set, and you end up with bent tacos instead of crisp ones. A short simmer after adding the taco seasoning is what brings the mixture together and keeps the flavor concentrated.
Another small but important thing: don’t overfill the shells. A generous scoop is fine, but packing them to the brim makes it harder for the cheese to melt evenly and more likely for the tacos to collapse when you move the pan. The goal is a tidy mound of beef, not a heaping pile that spills out before the first bite.
What the Beef, Cheese, and Shells Are Each Doing Here
- Ground beef — Use an 80/20 or 85/15 blend if you can. It has enough fat for flavor, but still lets you drain off the excess so the filling doesn’t turn greasy. Leaner beef works too, but it can taste a little drier unless you keep the seasoning sauce tight.
- Taco seasoning — Store-bought seasoning is fine here because the beef is getting baked and topped with fresh ingredients. If your packet runs salty, hold back a little and taste after the simmer. Homemade seasoning works too, especially if you like more cumin or heat.
- Hard taco shells — This is not the place for soft tortillas. The shells need structure so they can stand upright and stay crisp under the cheese. If yours are fragile, nestle them tightly in the baking dish so they support each other.
- Cheddar cheese — Shred it yourself if possible. Pre-shredded cheese has anti-caking starches that slow melting, and the top won’t get as smooth and unified. Sharp cheddar gives the strongest flavor and stands up best against the seasoned beef.
- Toppings — Keep the lettuce, tomato, sour cream, and jalapeño for after baking. Anything wet should go on at the end so the shells stay crisp. Salsa belongs on the side for the same reason.
Getting the Shells Crispy Without Burning the Cheese
Brown the beef first
Cook the beef over medium-high heat until it’s no longer pink and you can see browned bits in the pan. Break it into small crumbles as it cooks so it fits neatly into the shells. Drain off the excess fat before adding the seasoning, or the filling will taste heavy and make the tacos greasy.
Build the seasoned filling
Stir in the taco seasoning and water, then simmer for 2 to 3 minutes until the liquid reduces and clings to the meat. You want the mixture moist, not wet. If there’s pooled liquid left in the pan, keep it simmering a minute longer because that extra moisture is what softens baked shells.
Assemble with enough support
Set the taco shells upright in a baking dish so they lean against one another and stay stable. Divide the beef evenly, then shower the tops with cheddar. If the shells wobble, tuck folded bits of foil around the outside to help hold them in place while they bake.
Bake just until the cheese melts
Ten to twelve minutes at 350°F is enough. You’re looking for melted cheese and shells that feel crisp when tapped, not dark brown edges. If you leave them in too long, the cheese can go oily and the shells can pick up a bitter toastiness instead of that clean taco crunch.
How to Adapt These Baked Tacos for Different Nights
Make them spicier
Add diced jalapeño to the beef while it simmers, or use a hot taco seasoning blend. You can also finish the tacos with pepper jack instead of cheddar. That swap gives you a sharper heat and a little more melt, but it pulls the flavor away from the classic mild taco-night version.
Make them dairy-free
Skip the cheese and use a dairy-free shredded blend if you want the baked finish, or leave it off entirely and top with avocado after baking. The tacos still work because the seasoned beef is doing most of the heavy lifting. Just know the shells won’t get that sealed, cheesy top that helps hold everything together.
Use ground turkey instead
Ground turkey works well if you season it the same way and don’t skip the simmer. Add a small splash of oil to the pan first, because turkey can cook up a little dry and crumbly. The flavor stays clean and lighter, but the tacos won’t have quite the same richness as beef.
Turn them into a crowd tray
Use two baking dishes side by side and prep the tacos in a single layer so the heat can circulate around the shells. This keeps them crisp instead of trapping steam in a crowded pan. They’re best served right away, while the shells still snap when you lift them.
Storage and Reheating
- Refrigerator: Store the beef separately for up to 4 days. The assembled tacos will soften, so keep toppings and shells apart if you want the best texture.
- Freezer: The cooked beef freezes well for up to 2 months. Don’t freeze assembled tacos; the shells turn soft and the fresh toppings won’t recover.
- Reheating: Warm the beef in a skillet or microwave until hot, then refill fresh shells and bake briefly if you want the cheese melted again. If you reheat the assembled tacos, use a 325°F oven for a few minutes only, because too much heat makes the shells taste stale and overdone.
Questions I Get Asked About This Recipe

Ground Beef Baked Tacos
Ingredients
Equipment
Method
- Preheat oven to 350°F. Position a baking dish ready for assembling upright taco shells.
- Brown the ground beef in a skillet over medium-high heat, breaking it into crumbles as it cooks. Drain excess fat and keep the beef in the skillet.
- Add taco seasoning and water to the beef, stirring to combine. Simmer for 2-3 minutes until the mixture thickens and looks evenly coated.
- Arrange the taco shells in a baking dish, standing them upright. Divide the seasoned beef among the shells so each one is filled.
- Sprinkle shredded cheddar cheese over each taco. Bake for 10-12 minutes at 350°F until the shells are crispy and the cheese is melted with a lightly bubbling surface.
- Top each baked taco with diced tomatoes and shredded lettuce. Add a dollop of sour cream and finish with diced jalapeño for a bright, fresh bite.
- Serve with salsa on the side. Plate immediately while the shells stay crisp.