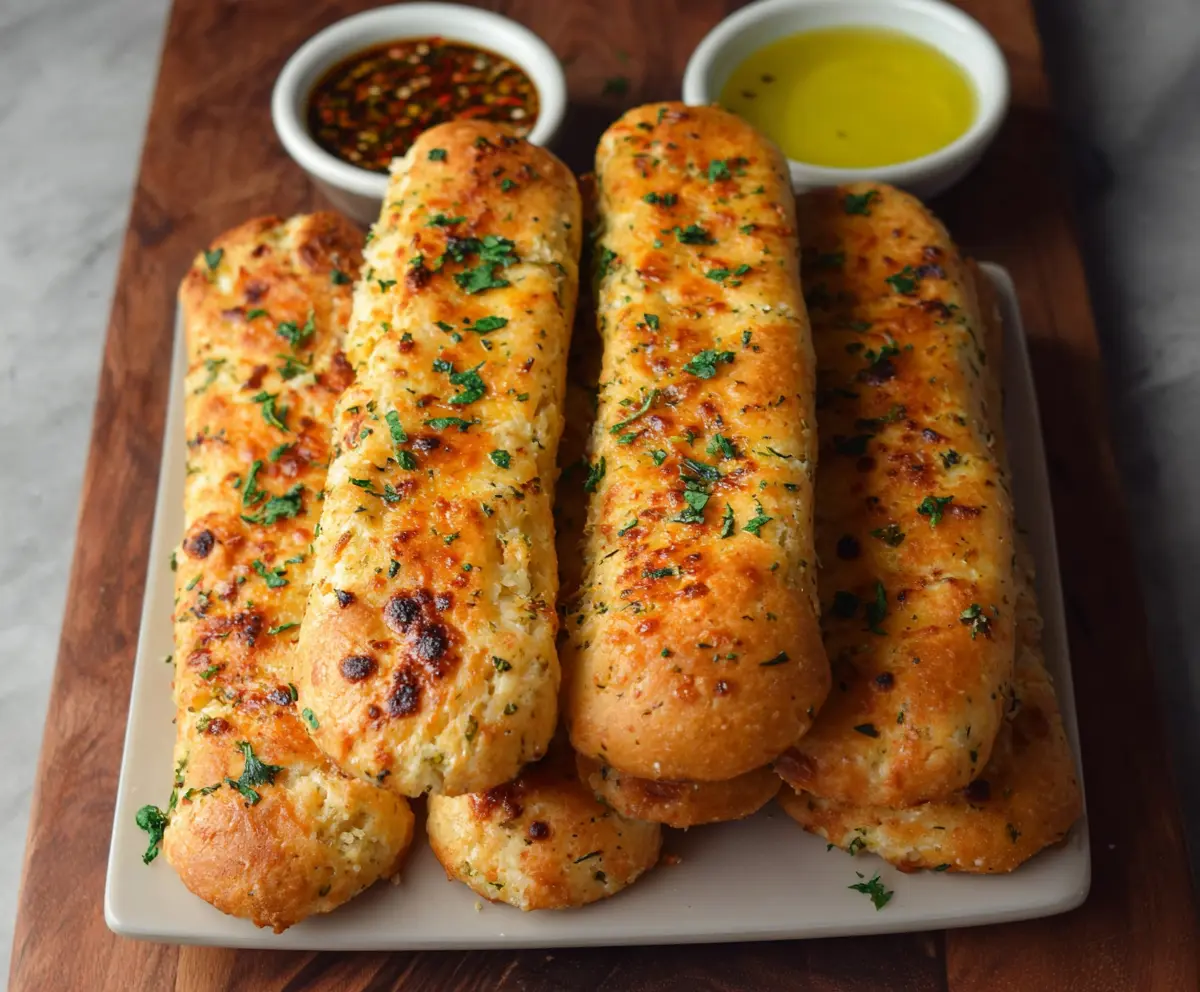
These Cottage Cheese Garlic Breadsticks are a fun twist on the classic! Soft and fluffy, they pack a tasty garlic punch and are great for dipping. Yum!
I love how easy they are to whip up, using cottage cheese to keep them super soft. Perfect for snacking or alongside soup, you’ll find yourself reaching for one (or two!) every time!
Key Ingredients & Substitutions
Cottage Cheese: This is essential for keeping the breadsticks moist and fluffy. If you’re dairy-sensitive, try using a non-dairy ricotta or a thicker yogurt as a substitute. I’ve found that good quality cottage cheese significantly enhances texture.
Shredded Mozzarella Cheese: It melts beautifully and gives gooeyness to the sticks. If you’re looking for a lower-fat option, part-skim mozzarella works well. For dairy-free, use a plant-based mozzarella blend that melts.
Flour: All-purpose flour is the go-to, but you can swap it for whole wheat flour for a nuttier flavor. Just note that you may need to adjust the liquid slightly. I’ve had luck using a mix of both for extra nutrients!
Garlic: Fresh garlic is key for the best flavor, but you can use garlic powder in a pinch. If you’re a garlic lover, consider adding more cloves or a sprinkle of garlic salt for an extra kick!
How Do You Get the Dough to the Right Consistency?
The dough for these breadsticks should be soft and slightly sticky, which will help keep them light and fluffy. If it feels too wet, add a bit more flour gradually until you achieve the consistency you want.
- Start by mixing the cottage cheese, mozzarella, and egg well, as this will blend moisture into your flour mix.
- When adding dry ingredients, do this gradually, mixing until just combined. Overworking the dough can make it tough.
- When kneading, be gentle! Only knead a few times until the dough holds together; this helps keep them light.
- If you find the dough too sticky to handle, dust your work surface and hands with flour.
By following these tips, you’ll serve up breadsticks that are soft, garlicky, and deliciously cheesy!
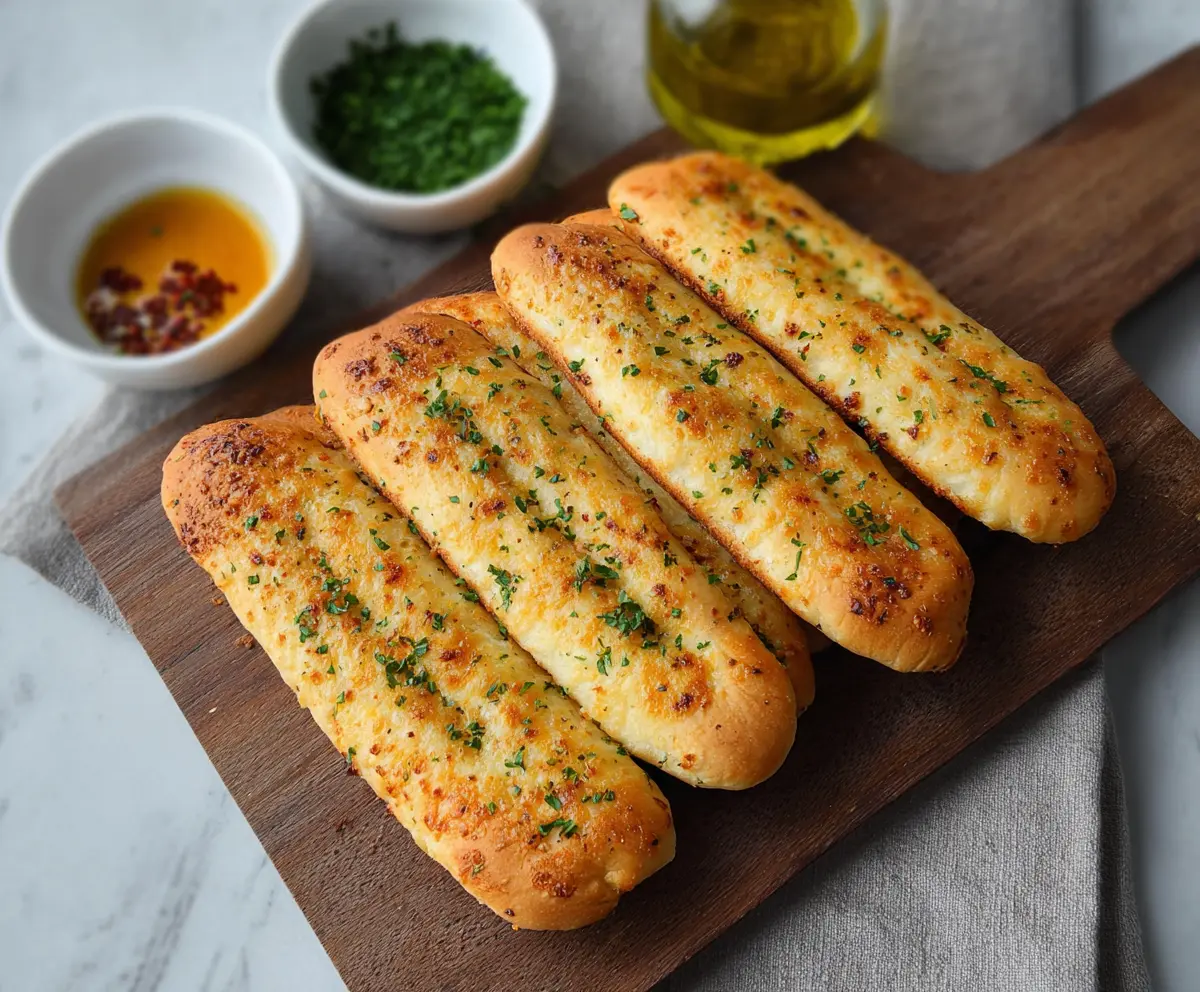
Cottage Cheese Garlic Breadsticks
Ingredients You’ll Need:
For the Dough:
- 1 cup cottage cheese
- 1 1/2 cups shredded mozzarella cheese
- 1 large egg
- 2 cups all-purpose flour, plus more for dusting
- 1 1/2 teaspoons baking powder
- 1/2 teaspoon salt
- 1 teaspoon garlic powder
- 1/2 teaspoon dried oregano (optional)
For the Topping:
- 4 tablespoons unsalted butter, melted
- 2 cloves garlic, minced or grated
- 2 tablespoons fresh parsley, finely chopped
- Extra parsley for garnish
For Serving:
- Olive oil
- Optional dipping sauce: marinara sauce or balsamic vinegar with chili flakes
How Much Time Will You Need?
This delightful recipe takes about 15 minutes to prep and 15-20 minutes to bake, for a total of around 30-35 minutes. Perfect for a quick snack or side dish!
Step-by-Step Instructions:
1. Preheat and Prepare:
Start by preheating your oven to 375°F (190°C). While it’s warming up, line a baking sheet with parchment paper or a silicone mat. This makes cleanup easier and prevents the breadsticks from sticking.
2. Mix the Wet Ingredients:
In a large mixing bowl, combine the cottage cheese, shredded mozzarella cheese, and the egg. Mix them together well until everything is nicely blended. This mixture will help keep your breadsticks soft and cheesy!
3. Combine the Dry Ingredients:
In another bowl, whisk together the all-purpose flour, baking powder, salt, garlic powder, and dried oregano (if you’re using it). This will be the foundation of your breadsticks.
4. Make the Dough:
Gradually fold the dry ingredients into the cheese mixture. Stir until a soft dough forms. It should feel slightly sticky, but manageable. If it’s too sticky, don’t hesitate to sprinkle in a little more flour!
5. Shape the Breadsticks:
Lightly flour your work surface, turn the dough out onto it, and gently knead it a few times just to bring it together. Then, divide the dough into about 8 equal portions. Roll each portion into stick shapes, roughly 5-6 inches long and about 1 inch thick.
6. Arrange on Baking Sheet:
Place the shaped breadsticks on the lined baking sheet, making sure to space them slightly apart so they have room to expand. You want them to bake beautifully!
7. Brush with Garlic Butter:
In a small bowl, mix the melted butter, minced garlic, and chopped parsley. Brush this savory garlic butter generously over each breadstick. The more, the merrier!
8. Bake:
Slide the baking sheet into the preheated oven and bake for about 15-20 minutes, or until the breadsticks are golden brown and cooked through. Keep an eye on them; you want them nice and golden!
9. Finish and Serve:
Once they’re out of the oven, you can brush them again lightly with some garlic butter for extra flavor and sprinkle with more fresh parsley for that beautiful touch. Serve warm with a side of olive oil or your favorite dipping sauce, such as marinara or chili-balsamic dip.
Enjoy your soft, cheesy, garlicky Cottage Cheese Garlic Breadsticks!
Can I Use Low-Fat Cottage Cheese?
Yes, low-fat cottage cheese works well in this recipe! It will still keep the breadsticks moist while reducing calories. Just make sure it’s smooth for the best texture.
Can I Make These Breadsticks Gluten-Free?
Absolutely! You can use a gluten-free all-purpose flour blend as a substitute. Make sure it contains a binding agent, like xanthan gum, to help maintain the dough’s structure.
What Should I Do if My Dough is Too Sticky?
If your dough feels sticky, just sprinkle a little extra flour as you knead it. You want it to be soft but manageable. Don’t add too much flour, or the breadsticks can turn out dense.
How Should I Store Leftover Breadsticks?
Store any leftovers in an airtight container at room temperature for up to 2 days. For longer storage, you can refrigerate them, or freeze the breadsticks for up to a month. Just reheat in the oven to maintain their softness!