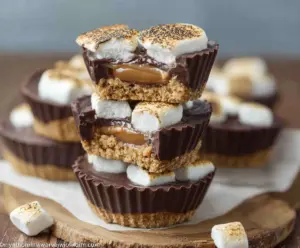
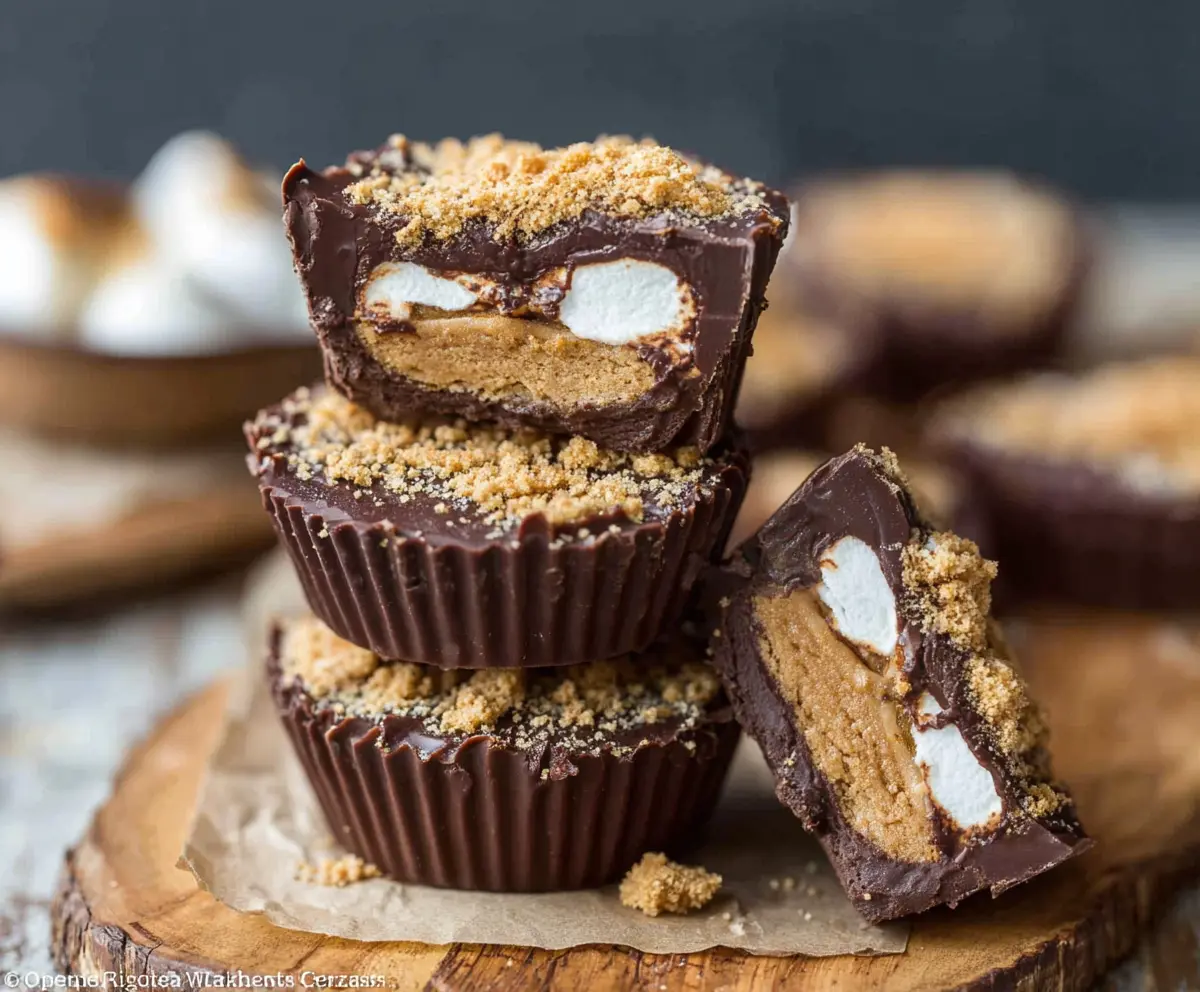
These S’mores Peanut Butter Cups are a fun twist on the classic treat! They have a rich peanut butter filling, crunchy graham crackers, and gooey marshmallows all encased in chocolate.
Who can resist a sweet bite that combines all these flavors? I love making these for movie night—they disappear faster than popcorn! 🍫🍪
They’re super easy to whip up: just layer the ingredients in a cupcake tin and freeze. Perfect for satisfying those late-night cravings or sharing with friends!
Key Ingredients & Substitutions
Graham cracker crumbs: These are essential for that classic s’mores crust. If you don’t have them, you can use crushed digestive biscuits or even vanilla wafer cookies for a different flavor. I like using honey-flavored graham crackers for an extra touch of sweetness!
Unsalted butter: Melted butter binds the crust together. You could swap it out for coconut oil or a plant-based margarine for a dairy-free option, which works just as well.
Creamy peanut butter: This gives the filling its rich texture. If you prefer, almond butter or sunflower seed butter are great substitutes, especially for nut allergies.
Semi-sweet chocolate chips: Chocolate is key here! If you want a milder flavor, milk chocolate works. You can also use dark chocolate for a deeper taste or even sugar-free chocolate chips if that fits your needs.
Coconut oil: This helps the chocolate layer smooth out. If you don’t have it, any neutral oil like canola or vegetable oil will work just fine—just keep the amount the same!
Mini marshmallows: These top it all off! If you can’t find mini ones, regular marshmallows cut into pieces will do. For a fun twist, check out flavored marshmallows, like vanilla or chocolate!
What’s the Best Way to Toast Marshmallows?
Toasting marshmallows adds a special touch! Here’s how to get that perfect golden color without setting off smoke alarms:
- **Use a kitchen torch:** Hold it a few inches away and rotate the marshmallow as you gently heat it until golden brown.
- **Broiler method:** Place the cups under the broiler for just 30-60 seconds. Keep your eyes on them, as they can burn quickly!
- **Campfire-style:** If you’re feeling adventurous, roast marshmallows over an open flame on a skewer. Just make sure to let them cool slightly before placing them on the cups!
Toasting pops the flavor and gives that classic s’mores vibe. It’s definitely worth the extra step!
How to Make S’mores Peanut Butter Cups
Ingredients You’ll Need:
For the Base:
- 1 1/2 cups graham cracker crumbs
- 6 tablespoons unsalted butter, melted
For the Peanut Butter Filling:
- 1 cup creamy peanut butter
- 2 tablespoons powdered sugar
For the Chocolate Layer:
- 2 cups semi-sweet chocolate chips
- 1 tablespoon coconut oil (or vegetable oil)
For the Topping:
- Mini marshmallows (about 20-25)
How Much Time Will You Need?
This delicious treat will take you about 20 minutes of prep time. After that, you’ll want to let it chill for at least 1 hour to ensure everything is set properly. In total, you’re looking at about 1 hour and 20 minutes before they are ready to serve!
Step-by-Step Instructions:
1. Prepare the Crust:
In a medium bowl, mix the graham cracker crumbs and melted butter until they’re fully combined. The mixture should be crumbly but stick together when pressed.
2. Form the Base Layer:
Line a muffin tin with cupcake liners. Now, divide the graham cracker mixture evenly among the liners. Firmly press the mixture into the bottom of each liner to create a nice, even crust layer.
3. Make the Peanut Butter Filling:
In another bowl, combine the creamy peanut butter and the powdered sugar. Stir until it’s smooth and well mixed. Now, scoop small dollops (about 1 teaspoon each) of this mixture and place one on top of each graham cracker crust.
4. Melt the Chocolate:
Grab a microwave-safe bowl and add the chocolate chips and coconut oil. Microwave in 30-second increments, stirring well between each session, until the chocolate is completely smooth and melted.
5. Add the Chocolate Layer:
Spoon the melted chocolate over the peanut butter dollops, filling them nearly to the top. Make sure each cup is evenly covered.
6. Top with Marshmallows:
Place a few mini marshmallows on top of the chocolate layer in each cup. Feel free to stack them a bit for extra gooeyness!
7. Toast the Marshmallows:
If you have a kitchen torch, carefully toast the marshmallows until they are golden brown and slightly melted. If not, you can place the cups under a broiler for about 30-60 seconds—just keep a close eye on them so they don’t burn!
8. Chill to Set:
Now, it’s time to chill! Put the muffin tin in the fridge or freezer for at least 1 hour, or until the chocolate is firm and everything is nicely set.
9. Serve:
Once they are fully set, carefully remove each cup from the liners. Enjoy your delicious gooey, crunchy S’mores Peanut Butter Cups!
These treats bring together the best parts of s’mores in a fun, easy-to-eat format. Enjoy sharing them or savoring them all on your own! 🍫🔥🍪
Can I Use Crunchy Peanut Butter Instead of Creamy?
Yes, you can absolutely use crunchy peanut butter for added texture! Just keep in mind that the consistency may be slightly different, and you’ll get some delightful crunch in each bite.
How Should I Store Leftover S’mores Peanut Butter Cups?
Store any leftovers in an airtight container in the refrigerator for up to a week. If they last longer than that, you can freeze them for up to three months. Just be sure to let them thaw in the fridge before enjoying!
Can I Leave Out the Marshmallows?
While the marshmallows are a key part of that s’mores flavor, you can certainly omit them if preferred. You can replace them with an additional layer of chocolate or even a sprinkle of sea salt for a different twist!
What If I Don’t Have a Kitchen Torch?
No worries! You can achieve a similar toasted look by placing the cups under the broiler for 30-60 seconds. Just watch them closely to prevent burning. Alternatively, you can skip the toasting altogether— they’ll still taste amazing!