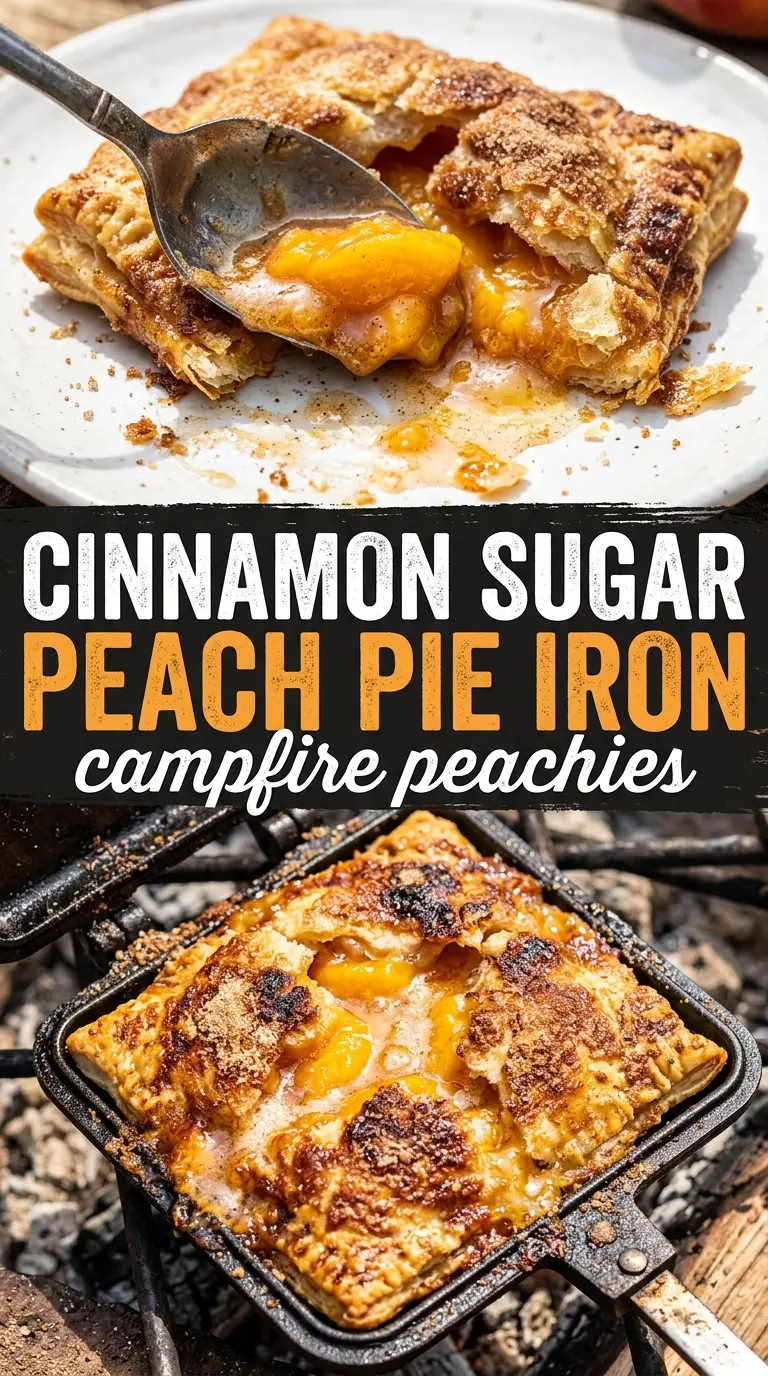
Campfire Peachies hit that sweet spot between crisp, gooey, and just a little messy in the best possible way. The bread turns deep golden in the pie iron while the peach filling warms through and bubbles at the edges, giving you a dessert that tastes like a shortcut peach pie with a toasty campfire finish.
What makes this version work is the balance: canned peach pie filling brings the juicy center without extra prep, while cinnamon sugar adds a warm, spiced note that keeps the filling from tasting flat. Buttering the outside of the bread is what gives you that crunchy, even browning, and the two-minute rest at the end matters because the filling is molten straight off the coals.
Below, I’ve included the one detail that keeps these from leaking everywhere, plus a few simple swaps if you want to change the bread, the filling, or the way you serve them.
The bread came out crisp and buttery, and the peach filling thickened just enough that it didn’t run all over the place. I let them rest for two minutes like you said and the centers were perfect.
These Campfire Peachies come out crisp on the outside and gooey in the middle, with just enough cinnamon sugar to taste like peach pie over the fire.
Save this peach pie iron dessert for your next campfire night
The Part That Keeps the Peach Filling Inside the Bread
The trick with pie iron desserts is not packing in too much filling. Peach pie filling softens as it heats, and if you overload the bread, it squeezes out before the crust has time to seal and crisp. A modest spoonful gives you that juicy center without losing half the dessert to the fire grate.
Butter on the outside of the bread does two jobs here: it keeps the sandwich from sticking to the iron, and it helps the bread brown evenly over the coals. If your campfire is running hot, move the pie iron to the edge of the fire or over medium coals. Too much direct heat burns the bread before the middle turns warm.
What the Ingredients Are Doing in Campfire Peachies
- White bread — Soft sandwich bread seals well in the pie iron and browns into a crisp shell. Heavier breads can work, but they take longer to toast and can crack at the edges before the filling is hot.
- Peach pie filling — This gives you the sweet, thick, spoonable center without needing to cook fruit first. If you want to use homemade peach filling, it needs to be thickened first so it doesn’t turn the sandwich soggy.
- Cinnamon sugar — This adds a warmer, bakery-style finish and keeps the peach flavor from tasting one-note. A simple mix of cinnamon and granulated sugar works fine if that’s what you have.
- Butter — Real butter on the outside of the bread is what creates that toasted, golden finish. Margarine works in a pinch, but it won’t brown as evenly or taste as rich.
- Powdered sugar — This is the final dusting that makes the sandwiches look finished and adds a little soft sweetness on top. Skip it if you want, but it does help balance the salty butter and warm fruit.
Getting the Toast Right Before the Filling Leaks
Butter the Bread Generously
Spread butter on one side of each bread slice, going all the way to the edges so the crust browns evenly. The buttered side needs to face out once the sandwich goes into the pie iron. If you leave the corners dry, they tend to turn pale and brittle instead of crisp.
Build a Thin, Even Center
Set one slice butter-side down in the pie iron, spoon the peach filling onto the bread, and sprinkle on the cinnamon sugar. Keep the filling away from the edges so the sandwich can seal cleanly when you close it. A thick mound in the center is what causes the filling to squeeze out and scorch.
Cook Over Gentle Coals
Close the pie iron and cook for 2 to 3 minutes per side, checking for a deep golden color and crisp edges. If the bread is browning too fast, the fire is too hot. Rotate the iron often so both sides get even color without burning one corner black.
Let It Set Before Serving
Remove the pie iron carefully and let the sandwich rest for 2 minutes before dusting with powdered sugar. That short rest lets the peach filling thicken slightly so it doesn’t spill out the second you cut into it. The center should still be warm and soft, just not lava-hot.
How to Adapt These for Different Campsites and Crowds
Use brioche or Texas toast for a richer version
Thicker, richer bread gives you a more tender center and a sturdier crust, but it also takes a little longer to toast through. If you use it, keep the filling modest so the edges still seal before the bread gets too dark.
Make it dairy-free with plant-based butter
A good plant-based butter will still brown the bread and keep it from sticking. The flavor is a little less rich than dairy butter, but the texture stays crisp if you cook it over moderate coals instead of high heat.
Swap in cherry or apple pie filling
Any thick canned pie filling works, but the flavor changes the whole dessert. Cherry tastes brighter and tarter, while apple leans more like a hand pie with extra cinnamon. Keep the amount the same so the sandwich still seals.
Storage and Reheating
- Refrigerator: Store leftovers in an airtight container for up to 2 days. The bread softens as it sits, so expect less crunch the next day.
- Freezer: I don’t recommend freezing these assembled; the filling makes the bread soggy when it thaws.
- Reheating: Reheat in a skillet over low heat or in a toaster oven until the outside crisps back up. Skip the microwave if you want the bread to stay crisp, because it turns the sandwich soft fast.
Answers to the Questions Worth Asking

Campfire Peachies
Ingredients
Equipment
Method
- Butter one side of each bread slice.
- Place one slice, butter-side down, in the pie iron.
- Spoon peach pie filling onto the bread and sprinkle with cinnamon sugar.
- Top with the second bread slice, butter-side up, then close the pie iron.
- Cook the closed pie iron over campfire coals for 2-3 minutes per side, until the bread turns golden and crispy, flipping once.
- Carefully remove the sandwiches from the pie iron.
- Let the sandwiches cool for 2 minutes.
- Dust with powdered sugar and serve.