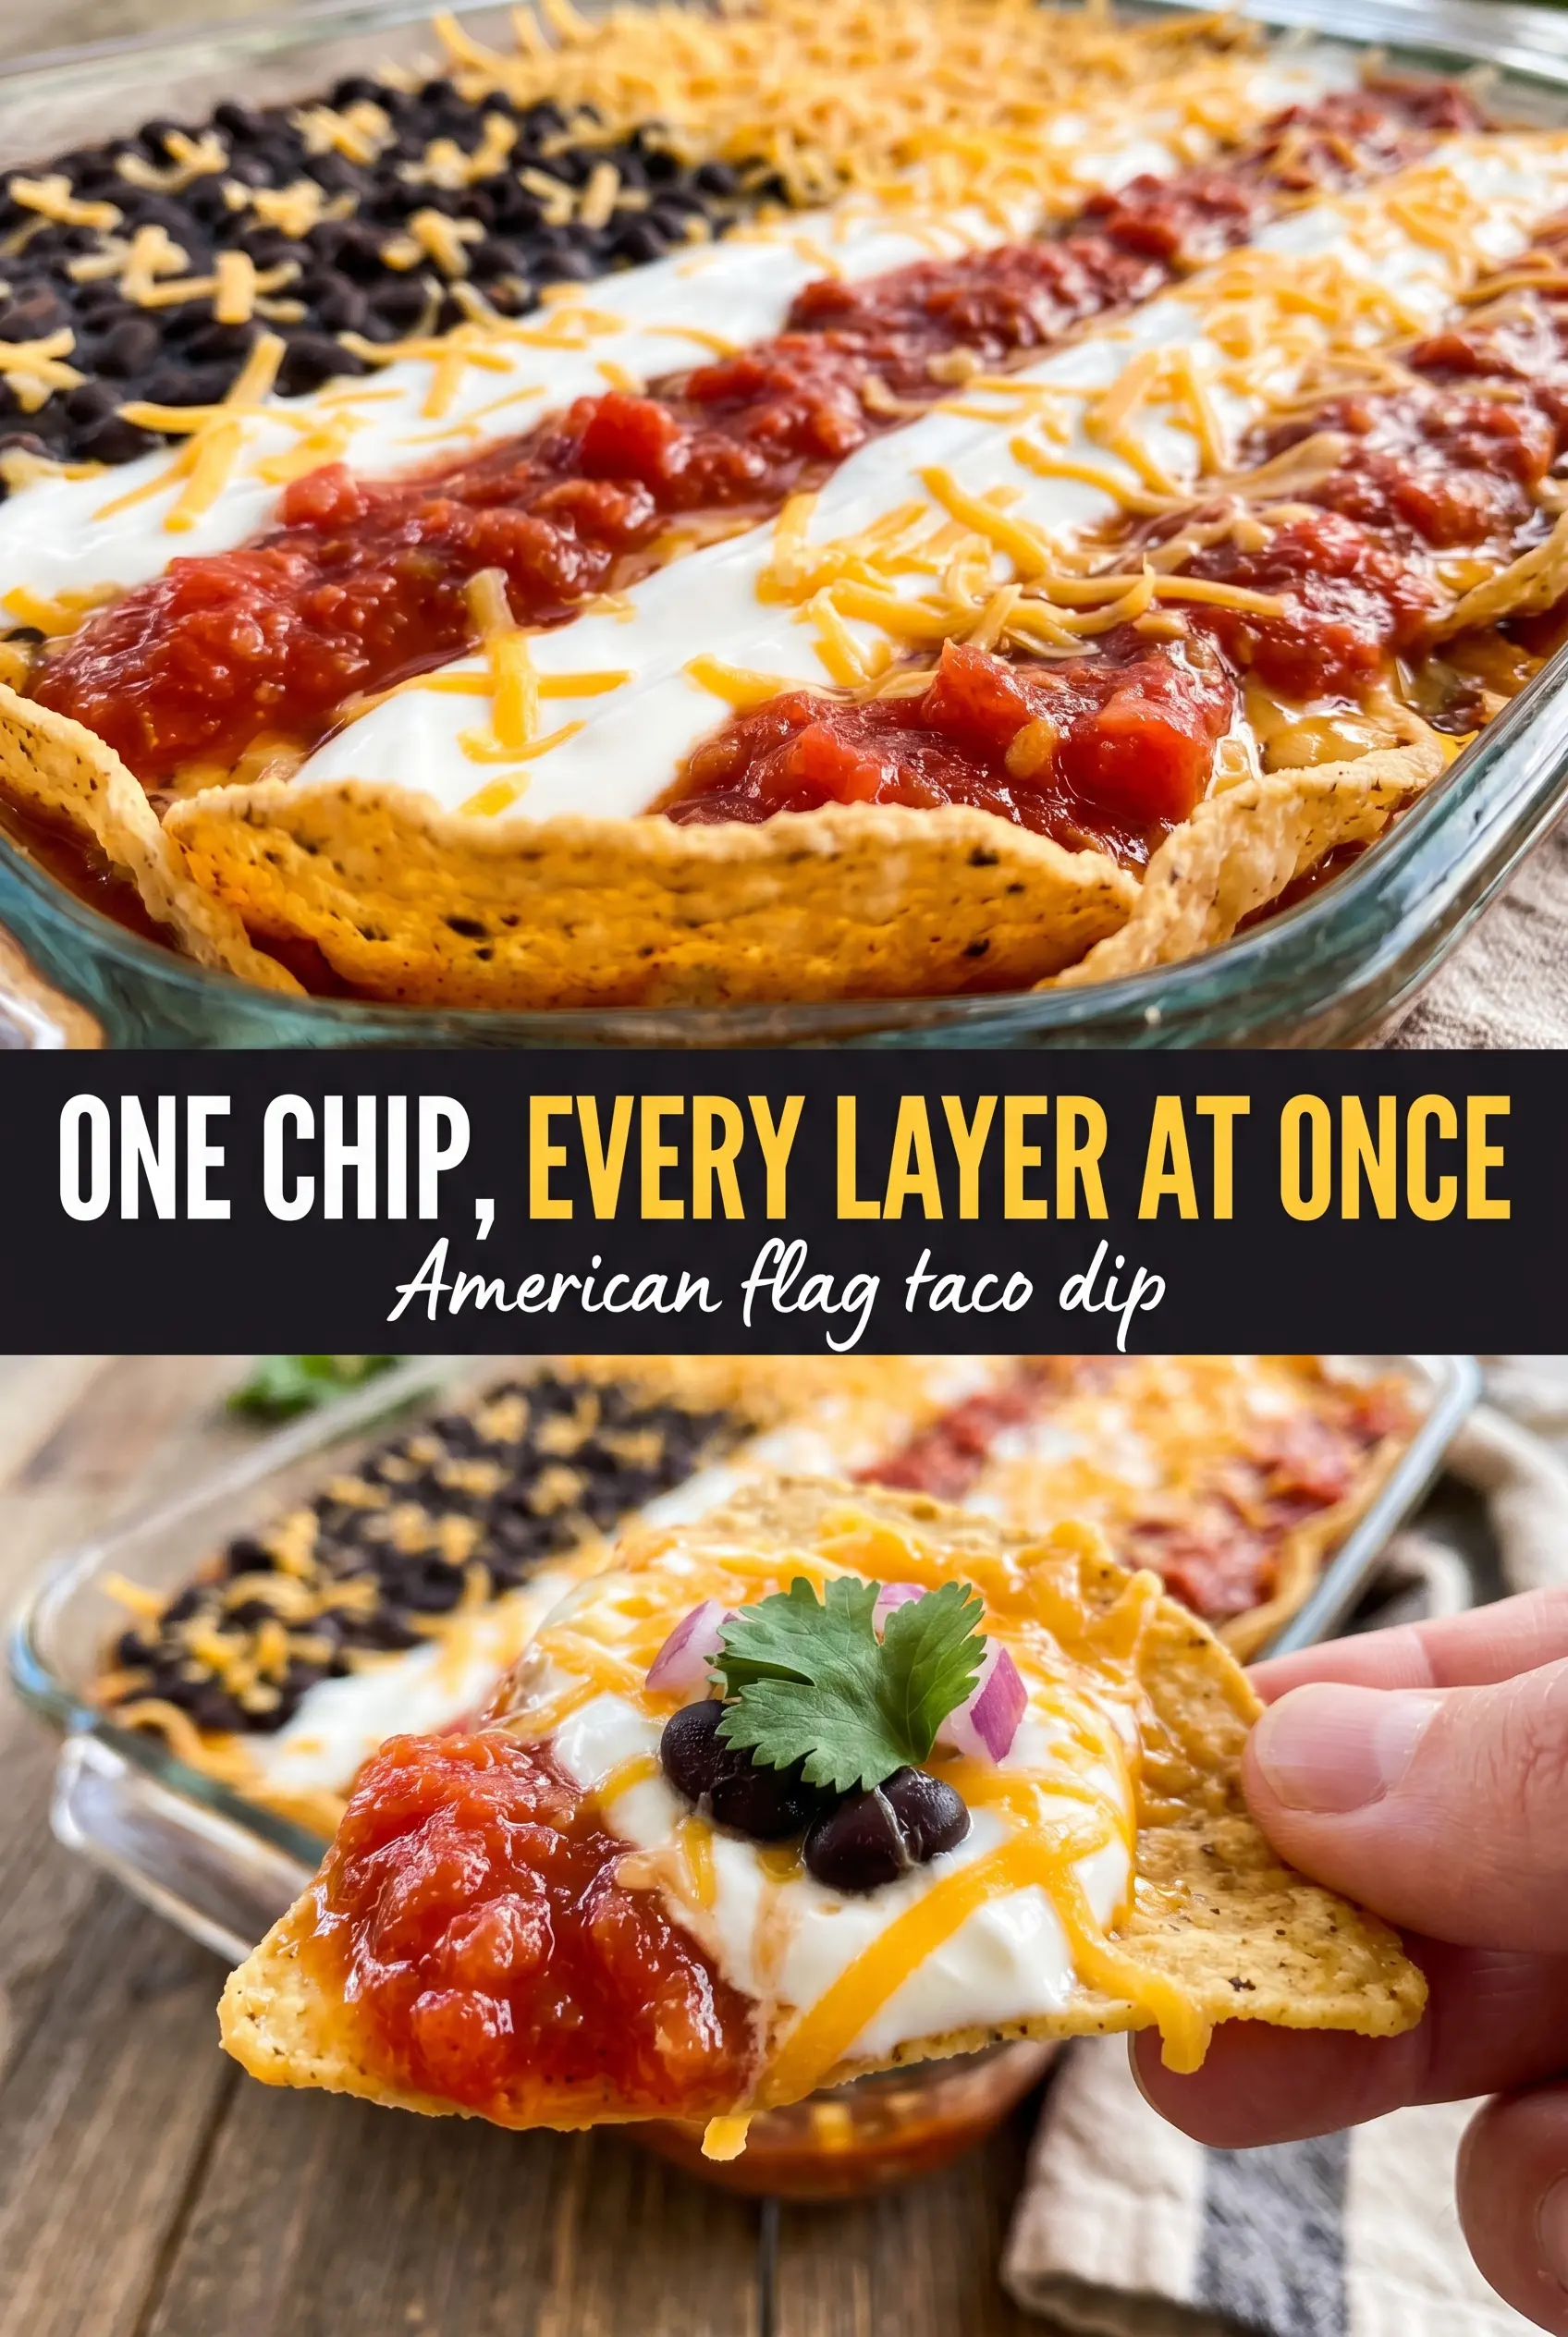
American Flag Taco Dip always gets the first spoonful gone fast because it hits every party-dip note at once: creamy, salty, a little tangy, and built to feed a crowd without any stove time. The best part is the presentation. When the sour cream stripes stay neat and the olive corner looks sharp, it turns a familiar layered taco dip into the thing everyone photographs before they dig in.
The structure matters here more than fancy ingredients. Softened cream cheese keeps the middle layer smooth instead of lumpy, and chilling the dip gives the layers enough firmness that the flag design holds when you cut into it. Chunky salsa or pico works better than thin salsa because extra liquid will blur the stripes and slide into the bean layer.
Below, I’ve included the small details that keep the layers clean, plus the easiest way to pipe the flag design if you’ve never done it before. There’s also a simple make-ahead note so you can assemble it before guests arrive and spend your time on chips instead of fussing with the tray.
The layers held their shape even after sitting out, and the sour cream stripes stayed neat after I chilled it. I used pico instead of salsa and the flag still looked crisp when I brought it to the table.
Like this American Flag Taco Dip? Save it to Pinterest for your next patriotic party, potluck, or 4th of July spread.
The Layer Order That Keeps the Flag From Sliding
The biggest mistake with layered taco dip is putting the softest layers too low or too early. Once that happens, the top gets heavy, the stripes slump, and the clean flag look disappears the minute someone dips in. This version starts with the refried beans and a seasoned cream cheese layer because those two give the whole tray enough structure to stay put.
The chill time matters more than people think. Thirty minutes in the refrigerator firms the cream cheese, settles the guacamole, and helps the sour cream lines set just enough to slice cleanly with a chip. If you skip that rest, the design still tastes good, but the flag will spread the second the tray hits the table.
What Each Layer Is Doing in This Taco Dip
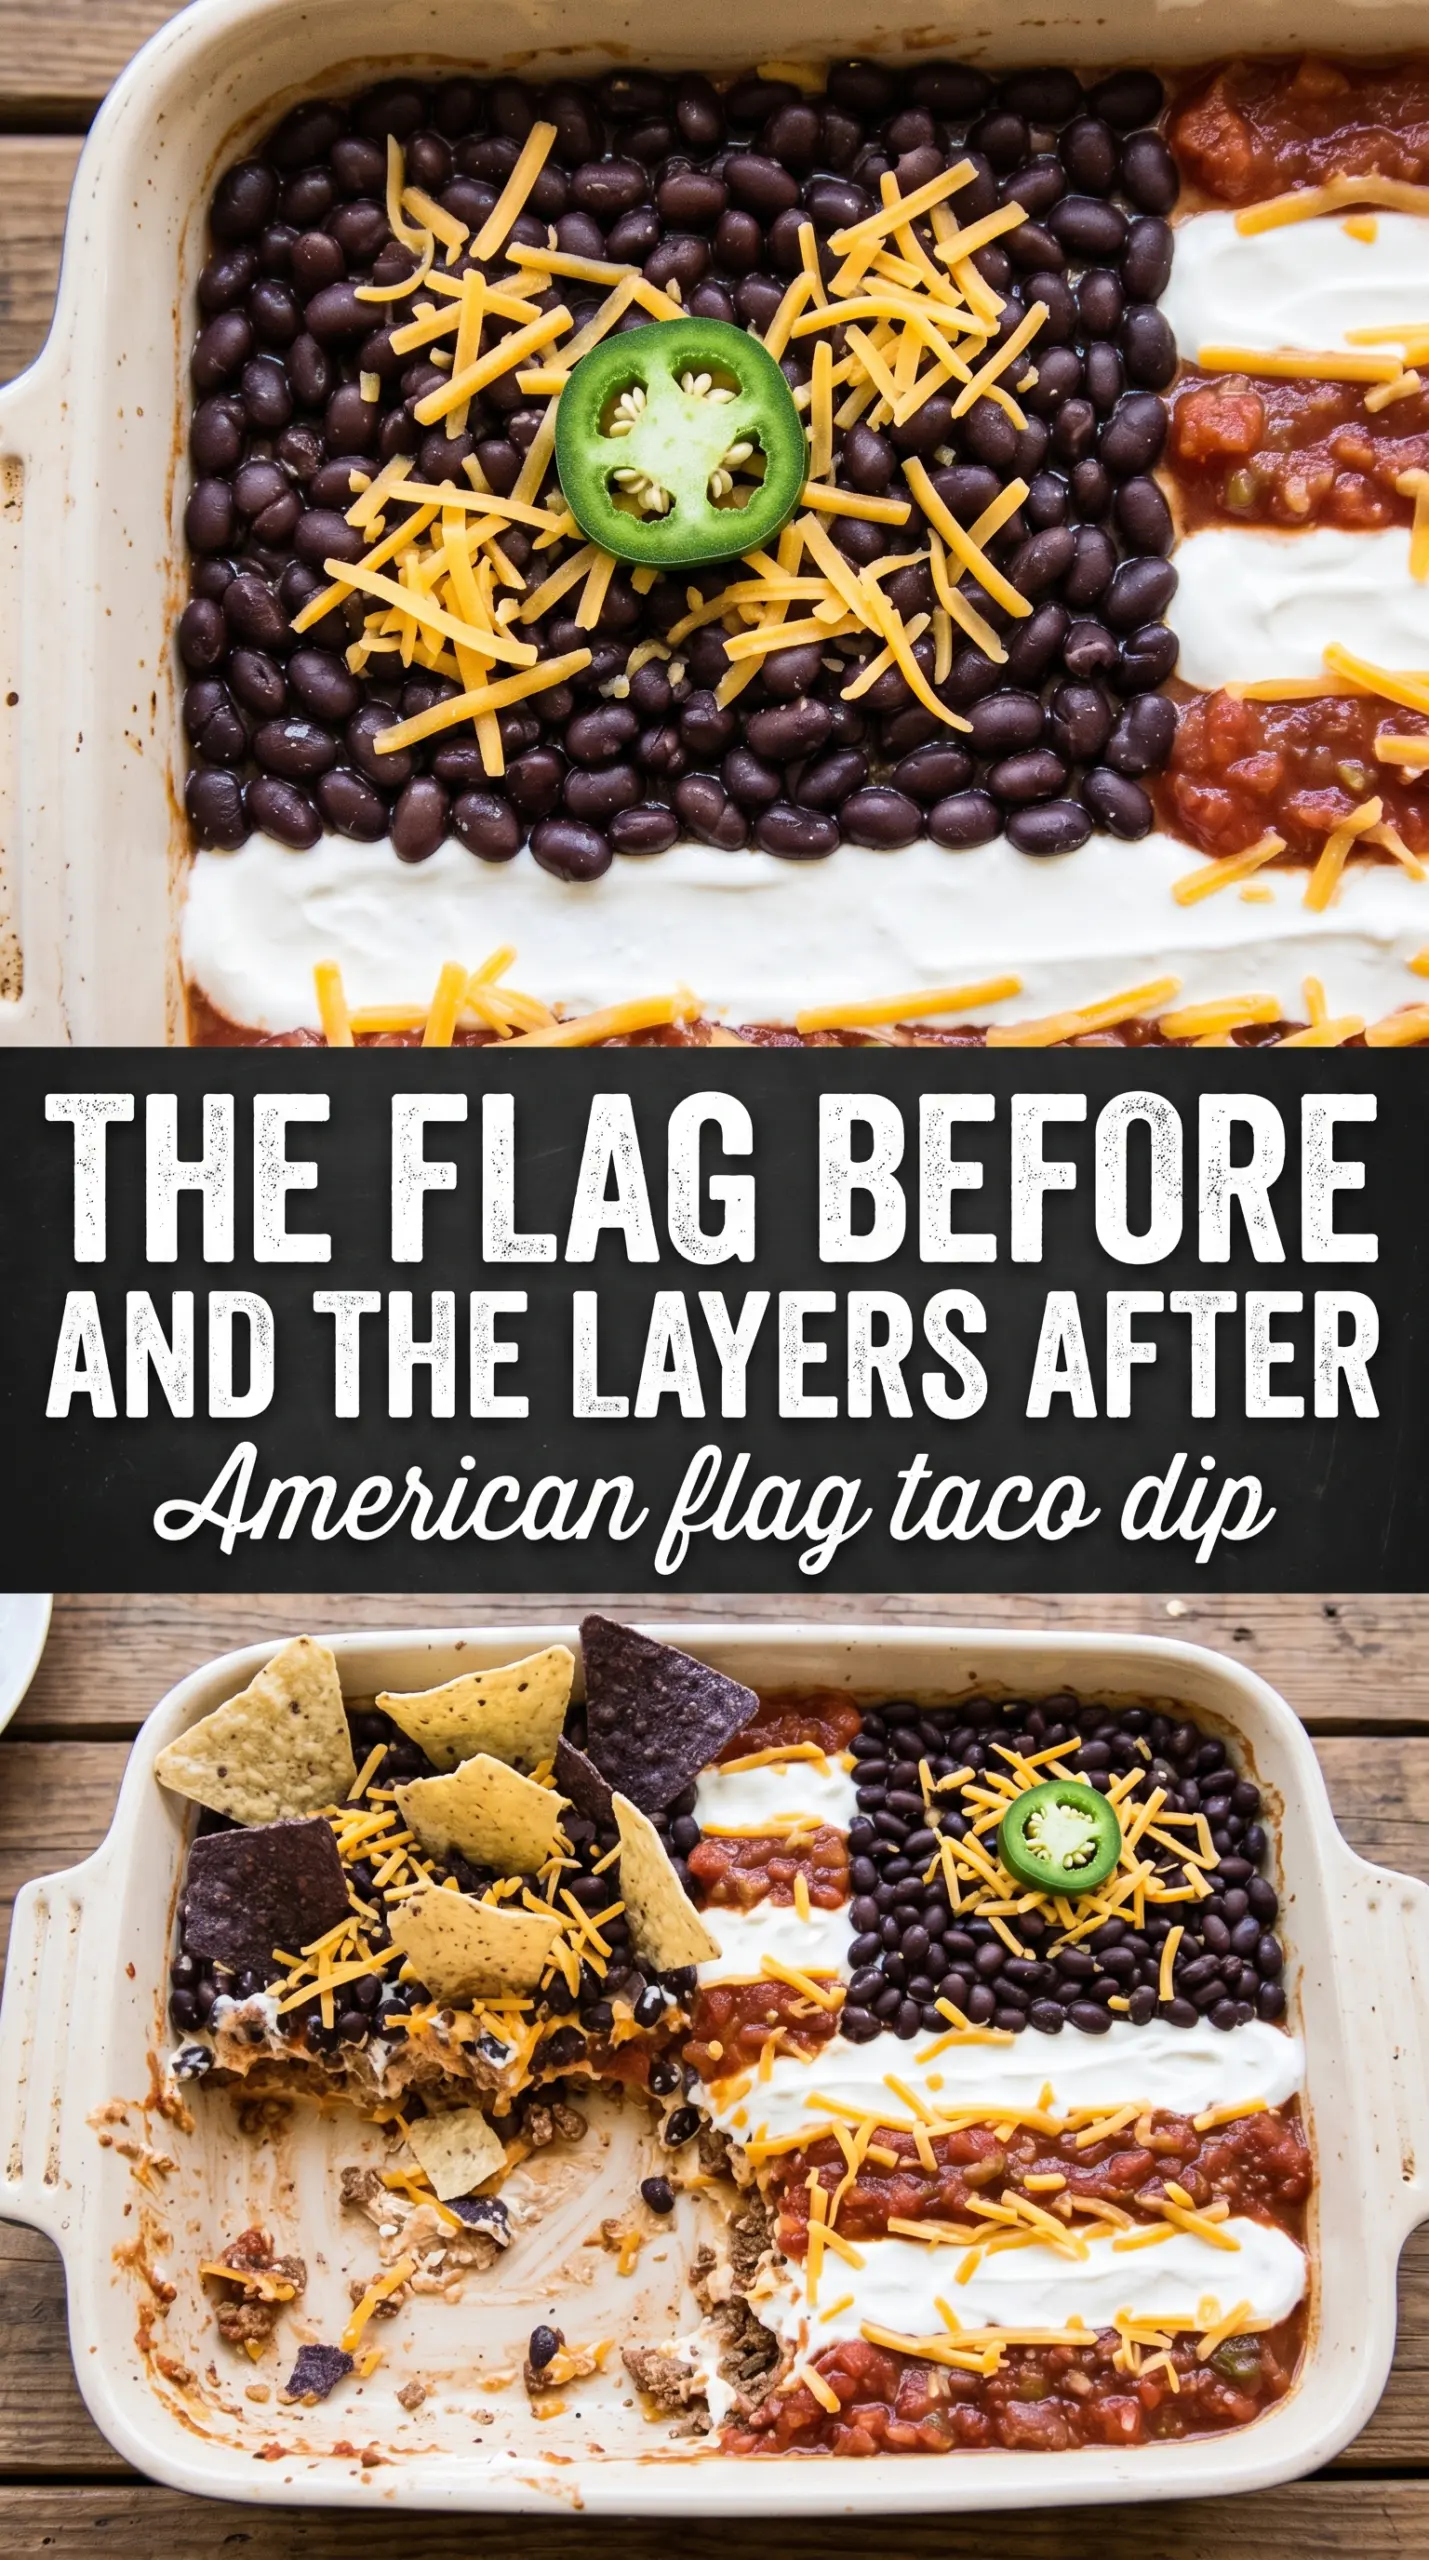
- Refried beans — This is the base that keeps everything anchored. Use a thick, spreadable style, not a loose or soupy one, or the layers above it will slide.
- Cream cheese — Softened cream cheese is what gives the middle layer body. If it’s cold, you’ll fight lumps and tear the bean layer while spreading.
- Taco seasoning — This seasons the creamy layer all the way through instead of leaving the top tasting plain. A packet works fine here because the dip needs that concentrated Tex-Mex punch.
- Sour cream — This is the white stripe layer, and it also lightens the richness of the beans and cheese. Full-fat sour cream pipes best and holds a cleaner line than a thinner light version.
- Chunky salsa or pico de gallo — You want pieces, not liquid. Too much moisture will bleed into the sour cream stripes and make the red rows messy.
- Black olives — These create the blue canton and add a salty bite. Slice them thin and pack them tightly so the corner reads as a solid block from above.
- Cherry tomatoes or red bell pepper — These are there for the red stripes and for a little freshness. Dice them small so they sit neatly between the sour cream lines instead of rolling around.
- Guacamole — This adds richness and helps bridge the creamy layers under the cheese. Use a thick guacamole, not a watery one, or it can dull the flag design.
Assembling the Flag Without Smearing the Stripes
Building the Base Layers
Spread the refried beans into a flat, even layer first and work all the way to the corners of the dish. Then mix the softened cream cheese with the taco seasoning until it’s smooth and spreadable, and lay it on gently so you don’t pull up the beans underneath. If the cream cheese feels stiff, it will drag the bean layer and leave bare patches, so let it sit at room temperature before you start.
Adding the Green and White Middle
Spread the guacamole over the seasoned cream cheese in a thin, even layer, then top it with the shredded cheese blend. After that, move to the sour cream. A piping bag or a zip-top bag with the corner snipped gives you the most control, and the lines stay much cleaner than spooning it on. Pipe slowly, because rushing is how you get broken stripes and gaps that are hard to fix.
Drawing the Red and Blue Design
Spoon the salsa or pico between the sour cream stripes instead of over them, then use the back of the spoon to nudge the rows into place. For the blue canton, pack the sliced black olives tightly into the upper left corner so it reads as one rectangle rather than a scattered patch. Finish with sliced green onions over the top, then chill the whole tray for 30 minutes before serving so the design sets and the chips don’t scrape through the layers immediately.
How to Adapt This for a Bigger Crowd, a Lighter Tray, or Different Toppings
Make it gluten-free without changing the structure
The dip itself is naturally gluten-free as long as your taco seasoning is certified gluten-free. The only place people get tripped up is the chips, so serve it with corn tortilla chips and check the seasoning packet if you’re cooking for someone sensitive.
Swap the dairy for a lighter cold dip
Use dairy-free cream cheese and a plain dairy-free sour cream if you need a lactose-free version. The texture will be a little softer and less tangy, so keep the chill time in place and use a thick guacamole to help the layers hold their shape.
Turn it into a smaller flag for a tight serving tray
Cut every layer in half and use an 8×8-inch dish if you don’t need a full party tray. The design still works, but the stripes will be shorter, so tighten the spacing between the sour cream and salsa rows to keep the flag recognizable.
Use diced red bell pepper instead of tomatoes
Red bell pepper gives you a cleaner-looking stripe because it doesn’t leak juice the way tomatoes can. Dice it fine and pat it dry first, especially if you want the top to stay crisp-looking for longer on the table.
Storage and Reheating
- Refrigerator: Cover and chill for up to 3 days. The flag design will soften a little, but the flavor holds up well.
- Freezer: I don’t recommend freezing this dip. The sour cream, guacamole, and cream cheese all change texture after thawing and the layers turn watery.
- Reheating: This is a cold appetizer, so don’t reheat it. If it has been out for a while, just return it to the refrigerator for 20 to 30 minutes to firm back up before serving again.
Questions I Get Asked About This Recipe
American Flag Taco Dip
Ingredients
Equipment
Method
- Spread refried beans in an even layer across the bottom of a large rectangular baking dish or serving tray.
- Mix cream cheese with taco seasoning until smooth, then spread evenly over the bean layer.
- Spread guacamole over the cream cheese layer, then top with the shredded cheese blend.
- Spoon sour cream into a piping bag or zip-lock bag with a corner snipped and pipe horizontal white stripes across the top of the dip.
- Add rows of salsa or diced red tomato between the sour cream stripes to create the red stripe effect.
- In the upper left corner, arrange sliced black olives tightly to form the blue canton rectangle.
- Scatter green onions across the top, chill for 30 minutes, and serve with tortilla chips.