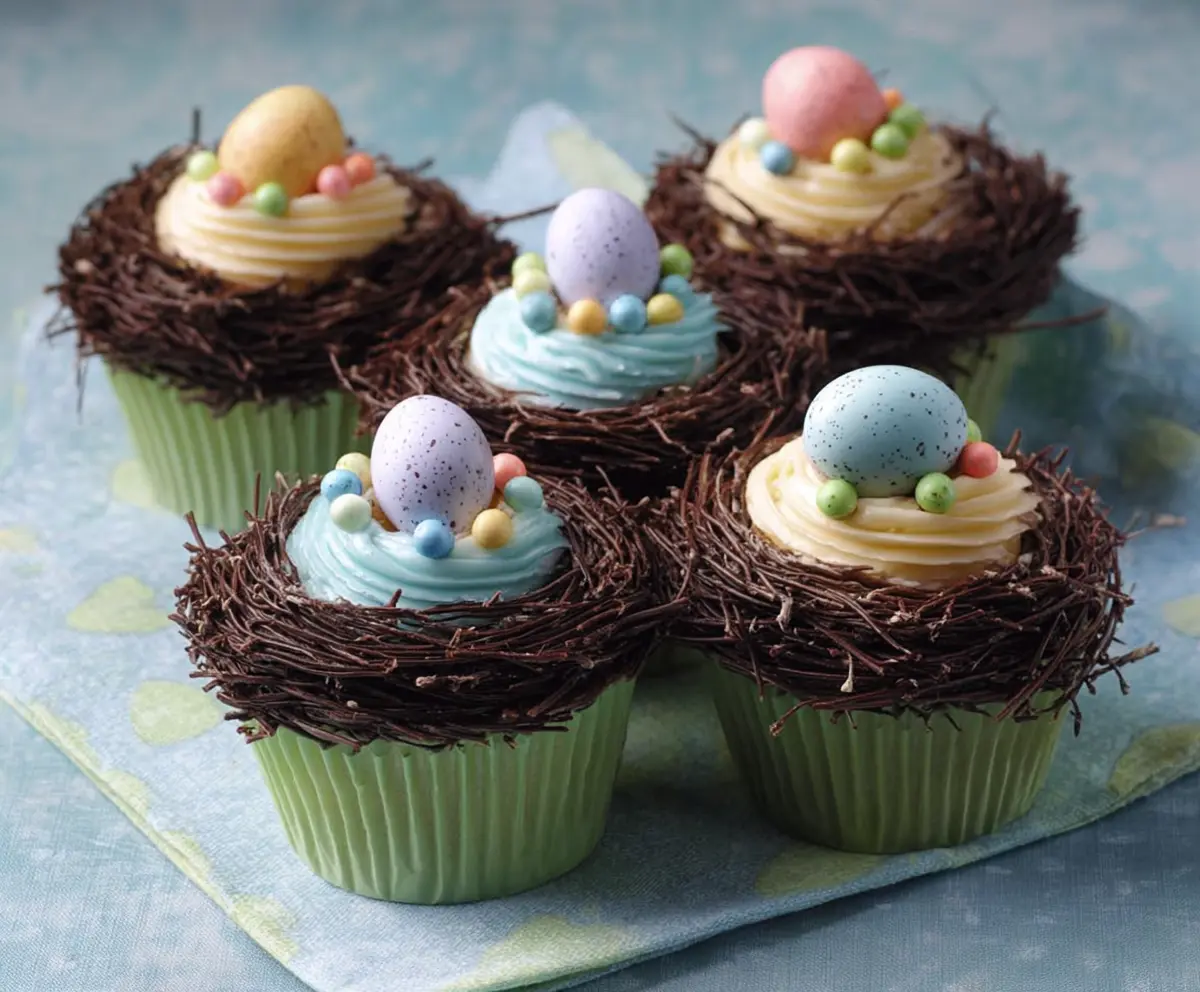
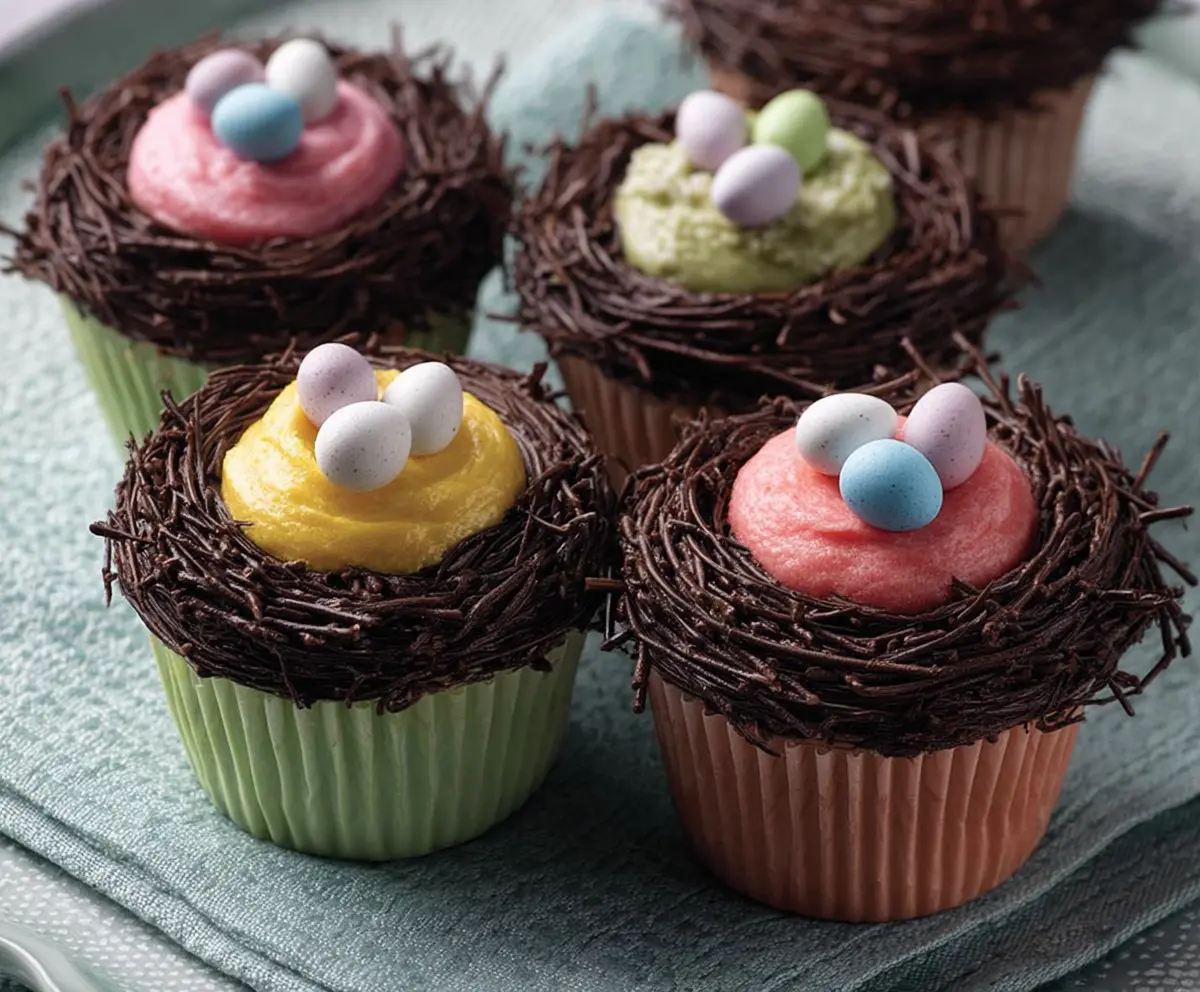
These fun Easter Egg Nest Cupcakes are a sweet delight! Topped with creamy frosting and colorful candy eggs, they look like little nests ready for springtime festivities.
Making these cupcakes is as easy as pie! I love how they bring a smile to everyone’s face, especially when the kids help decorate them. Get ready for some sticky fingers and giggles! 🐣
Key Ingredients & Substitutions
All-purpose flour: This keeps the cupcakes soft and fluffy. If you’re looking for a gluten-free option, you can use a gluten-free flour blend. I’ve found that these blends often work in equal measure to regular flour!
Unsalted butter: Softened butter is key for a fluffy texture. If you’re dairy-free, you can substitute with coconut oil or a plant-based butter alternative. Both will still give you that creamy richness.
Granulated sugar: This adds sweetness. For a healthier option, consider coconut sugar or a sugar substitute like agave if you want a low-calorie version.
Candy-coated chocolate eggs: These are super fun and colorful! If you want a different look or taste, swap them for jelly beans or chocolate-covered raisins. They’ll still look festive!
How Do I Get Fluffy Cupcakes?
Getting that light and airy texture in your cupcakes can be tricky. Here’s my simple strategy:
- Make sure your butter is softened but not melted. This helps trap air as you cream it with sugar.
- Beat the butter and sugar together until it’s light and fluffy—this can take about 3-5 minutes. It’s worth the time!
- When adding eggs, do so one at a time. This helps create a uniform mixture.
- Finally, be careful not to overmix when adding flour and milk. Just mix until combined to keep those lovely air pockets!
How to Make Easter Egg Nest Cupcakes
Ingredients You’ll Need:
For The Cupcakes:
- 1 ½ cups all-purpose flour
- 1 ½ tsp baking powder
- ¼ tsp salt
- ½ cup unsalted butter, softened
- 1 cup granulated sugar
- 2 large eggs
- 2 tsp vanilla extract
- ½ cup milk
For The Frosting:
- 1 cup unsalted butter, softened
- 4 cups powdered sugar
- 2 tsp vanilla extract
- 2-3 tbsp milk
- Food coloring (light blue, pastel yellow, optional)
For The Nest:
- 6 oz semisweet or dark chocolate
- 1 cup chow mein noodles or pretzel sticks (to mimic twigs)
Decorations:
- Candy-coated chocolate eggs (pastel colors)
- Small round colored candies (similar to mini M&Ms)
How Much Time Will You Need?
You’ll need about 30 minutes for prep and about 20-25 minutes for baking. After baking, let the cupcakes cool completely (which can take around 30 minutes). The decorating part is fun and should take another 20-30 minutes. All in all, you’re looking at around 1.5 to 2 hours for this delightful treat!
Step-by-Step Instructions:
1. Preheat the Oven and Prepare the Pan:
Start by preheating your oven to 350°F (175°C). Line a muffin tin with green cupcake liners to add a festive touch for the Easter theme.
2. Mix the Dry Ingredients:
In a medium bowl, whisk together the flour, baking powder, and salt. This helps combine everything evenly, so set it aside while you prepare the wet mixture.
3. Cream the Butter and Sugar:
In a large mixing bowl, cream together the softened butter and granulated sugar until the mixture is light and fluffy. This should take about 2-3 minutes using a hand mixer.
4. Add the Eggs and Vanilla:
Add the eggs one at a time, mixing well after each addition. Then, pour in the vanilla extract and mix until just incorporated.
5. Combine Wet and Dry Ingredients:
Now it’s time to combine! Alternately add your flour mixture and milk to the butter mixture. Start with the flour and end with the flour, mixing until just combined. This will keep the cupcakes light and airy!
6. Bake the Cupcakes:
Divide the batter evenly among the lined cupcake cups. Bake in the preheated oven for 18-22 minutes, or until a toothpick inserted in the center comes out clean. Then, let the cupcakes cool completely on a wire rack! Patience is key.
7. Make the Frosting:
For the frosting, beat the softened butter until creamy. Gradually add the powdered sugar while mixing. Then, mix in the vanilla and just enough milk to make it smooth and spreadable. If you want to make it colorful, divide the frosting into two bowls—color one light blue and the other light yellow.
8. Create the Chocolate Nests:
Melt the chocolate in the microwave or a double boiler until it’s smooth. Stir in the chow mein noodles or pretzel sticks until they’re well coated. On parchment paper, spoon out small nests with the mixture and shape them gently. Let them set until hard.
9. Decorate the Cupcakes:
Once the cupcakes are cool, pipe a swirl of frosting in the center of each cupcake. Carefully place the chocolate twig nests around your frosting.
10. Finish With Some Fun Decorations:
Top each frosting center with a larger candy-coated chocolate egg and surround it with smaller round candies to look like little eggs in a nest. Get creative and have fun with it!
11. Serve and Enjoy:
Let your delightful creations set for a bit before serving. Enjoy your charming Easter Egg Nest Cupcakes with family and friends!
Can I Use a Different Type of Flour?
Yes, you can substitute all-purpose flour with a gluten-free flour blend if needed! Just use the same amount, and your cupcakes should turn out just as tasty!
How Should I Store Leftover Cupcakes?
Store any leftover cupcakes in an airtight container at room temperature for up to 3 days. If you want to keep them fresh longer, you can also refrigerate them for up to a week. Just let them come back to room temperature before enjoying!
Can I Make These Cupcakes Ahead of Time?
Absolutely! You can bake the cupcakes a day in advance and store them in an airtight container. Just wait until you’re ready to serve to frost and decorate them, so they look fresh and appealing!
What Other Decorations Can I Use Besides Candy Eggs?
Feel free to get creative! You can use jelly beans, mini chocolate bars, or even edible flowers to decorate the nests. Just make sure they’re colorful and fun for a festive look!