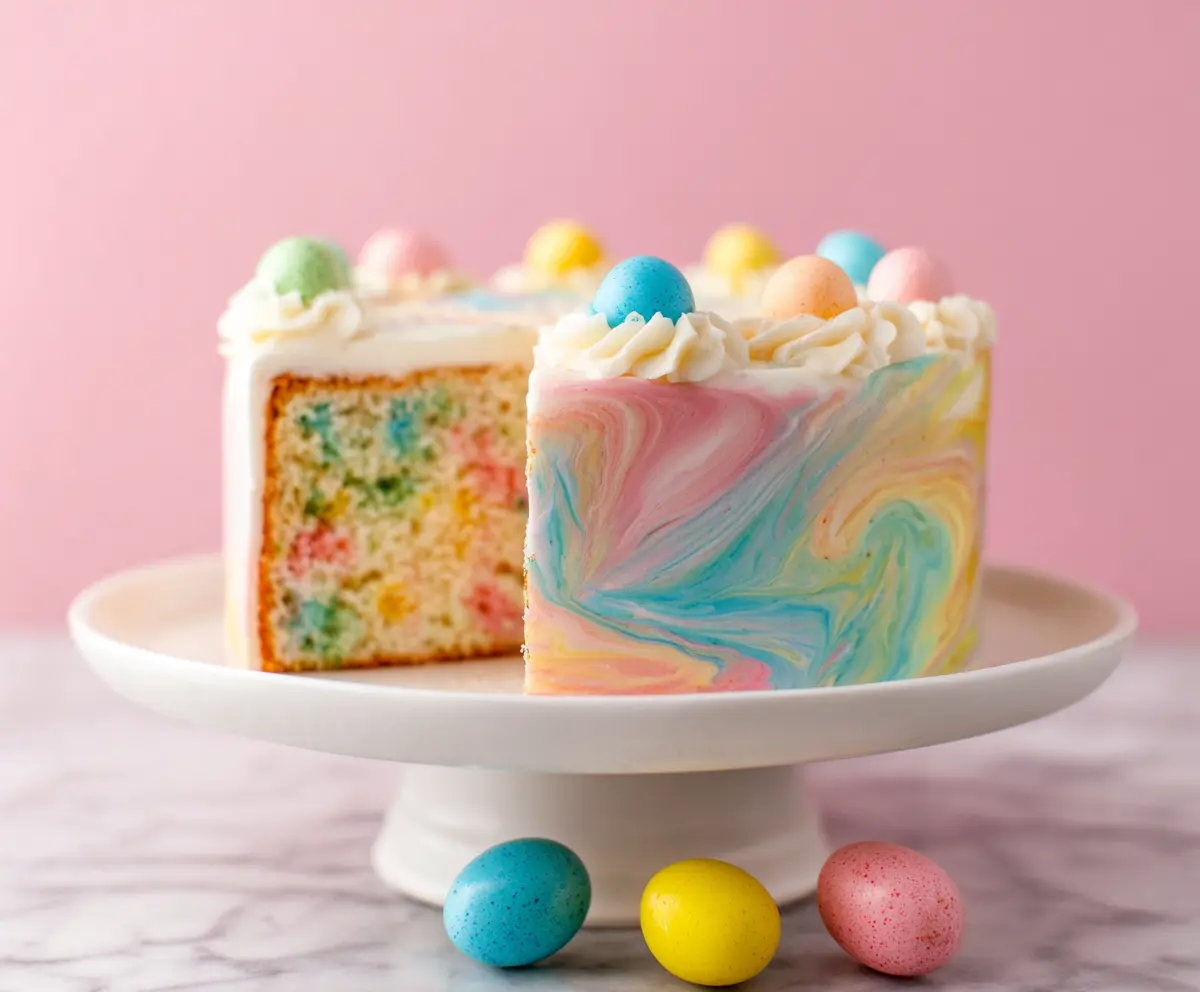
This festive Swirled Easter Cake is a treat for both the eyes and the tummy! It’s a colorful cake with layers of bright, tasty batter spun together to create a pretty design.
Making this cake is a fun way to celebrate spring and Easter! I love how it looks on the table, and it’s pretty delicious too. Trust me, it’s hard to resist a slice of this sweet surprise! 🐰🌷
Key Ingredients & Substitutions
All-Purpose Flour: This is the base of your cake. You can substitute with a gluten-free flour blend if you’re looking for a gluten-free option. Just make sure it’s a 1:1 substitute for the best results!
Butter: Unsalted butter is preferred for better control of saltiness. If you’re on a dairy-free diet, use a plant-based butter or coconut oil for a similar texture.
Granulated Sugar: This gives the cake its sweetness. If you want a healthier option, coconut sugar or a sugar substitute like stevia works well, but the cake texture may vary slightly.
Food Coloring: I love using gel food colors as they give vibrant results without changing the cake’s consistency. If you prefer natural options, you can use beet juice for red, turmeric for yellow, and spirulina for green.
How Can I Achieve That Perfectly Swirled Batter?
Swirling the colored batter is key to getting that confetti-like look! Here are some tips:
- Use a toothpick or skewer to create swirls. Just a gentle twist is all you need—mixing too much will dull the colors.
- Don’t overfill the pans. A little batter goes a long way, and you want space for rising.
- If your batter feels too thick, a tablespoon of milk can help with the texture before tinting.
What’s the Best Way to Frost the Cake Without Mess?
Getting a smooth, marbled effect with frosting can be tricky, so here’s how to do it right:
- Always start with a crumb coat. This helps catch any loose crumbs, making your final frosting layer neat.
- Apply a thick dollop of each color across the cake in spots. Don’t worry about being perfect; the swirls will add charm.
- When swirling, use a light hand. Start from the center and work your way out to avoid overmixing.
With these tips, your Swirled Easter Cake will not only look beautiful but also taste delicious! Enjoy baking!
Swirled Easter Cake
Ingredients You’ll Need:
For The Cake:
- 2 1/2 cups all-purpose flour
- 2 1/2 tsp baking powder
- 1/2 tsp salt
- 1 cup unsalted butter, softened
- 1 3/4 cups granulated sugar
- 4 large eggs
- 1 tbsp vanilla extract
- 1 cup whole milk
- Assorted pastel food coloring (pink, blue, yellow, green)
For The Buttercream Frosting:
- 1 cup unsalted butter, softened
- 4 cups powdered sugar, sifted
- 1/4 cup whole milk
- 2 tsp vanilla extract
- Pinch of salt
- Assorted pastel food coloring (pink, blue, yellow for swirling)
For Decoration:
- Mini pastel chocolate eggs or candy eggs
How Much Time Will You Need?
This delightful cake takes about 1 hour for preparation and baking, plus an additional 20 minutes for chilling the frosting. When you add in the time for cooling, all together, you’re looking at around 2 hours before the cake is ready to serve. Perfect for a festive occasion like Easter!
Step-by-Step Instructions:
1. Prepare the Cake Batter:
Start by preheating your oven to 350°F (175°C). Grease and flour two 8-inch round cake pans to prevent the cake from sticking. In a medium bowl, whisk together the flour, baking powder, and salt until fully combined. In a large bowl, cream the softened butter and granulated sugar together until the mixture is light and fluffy—this will take a few minutes! Next, add the eggs one at a time, beating well after each addition. Mix in the vanilla extract for that yummy flavor. Alternately add the flour mixture and milk into the butter mixture, starting and ending with the flour. Be careful to mix only until just combined; this will keep your cake light and airy.
2. Add the Colored Batter Drops:
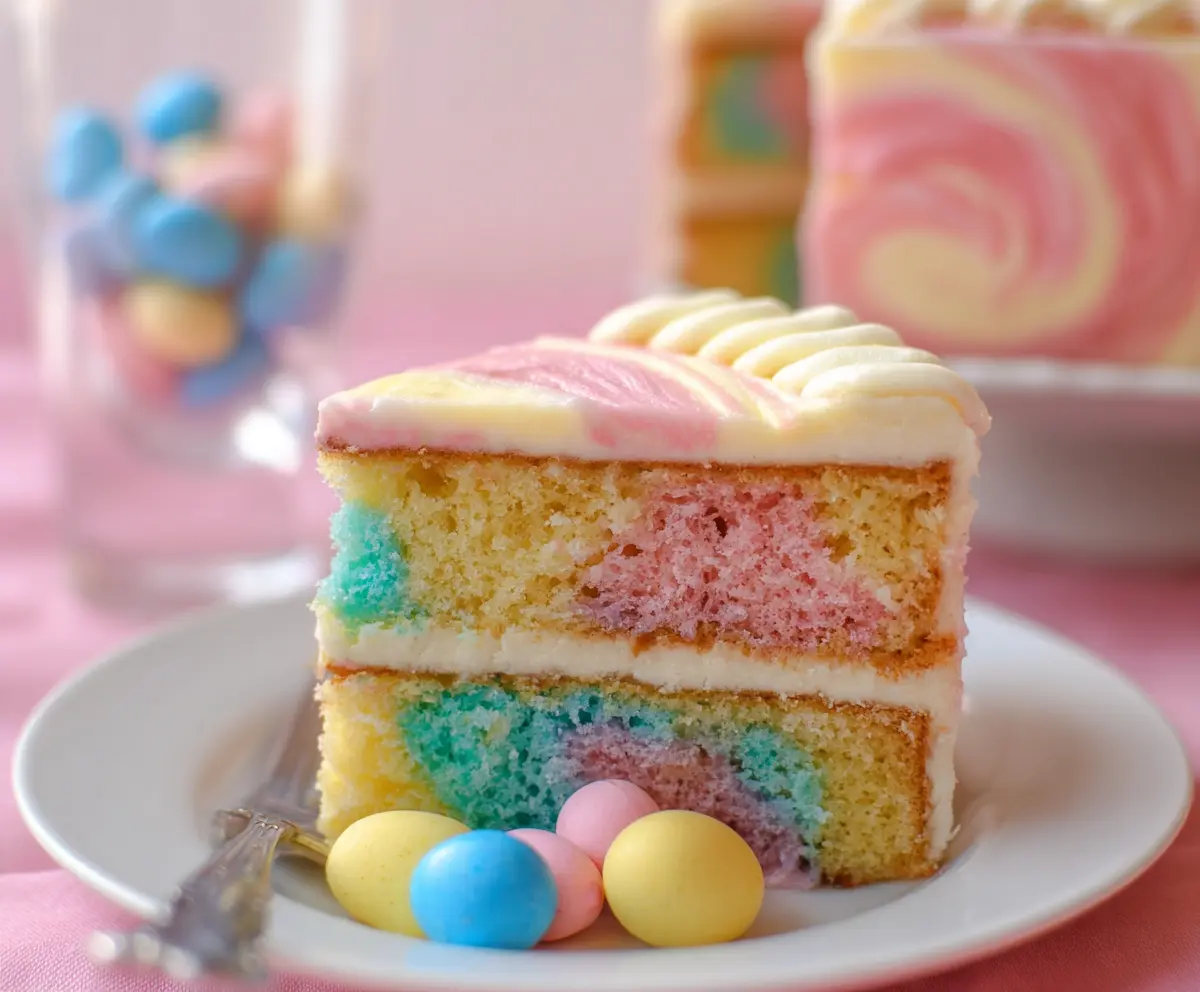
Now it’s time for some fun! Divide the batter evenly into four small bowls. Add a few drops of your assorted pastel food coloring to each bowl (pink, blue, yellow, green) and mix until you get the desired shades. In each prepared cake pan, carefully spoon dollops of the colored batter randomly to create lovely spots of color. Then, using a toothpick or skewer, gently swirl the colors together through the batter to create a confetti-like effect—be sure not to overmix, or the colors will blend too much!
3. Bake the Cake:
Pop those cake pans into the preheated oven and bake for about 30-35 minutes, or until a toothpick inserted into the center comes out clean. Once they’re done, let the cakes cool in the pans for about 10 minutes before inverting them onto wire racks to cool completely. The smell will make you eager to dig in!
4. Prepare the Buttercream Frosting:
While your cakes are cooling, make the buttercream frosting! In a large bowl, beat the softened butter until it’s smooth and creamy. Gradually add the sifted powdered sugar, alternating with milk, beating well after each addition to keep it fluffy. Mix in the vanilla extract and a pinch of salt. Beat the frosting until it’s light and fluffy. You should be able to tell simply by looking at it!
5. Create the Swirled Frosting Effect:
Now it’s time to make that frosting pretty! Divide the frosting into three bowls and tint each with a different pastel color – pink, blue, and yellow. Start by spreading a thin layer of plain white frosting over the cooled cake for a crumb coat. Chill the cake for 20 minutes in the fridge to set that layer. After chilling, dollop the colored frostings randomly over the top and sides of the cake. With an offset spatula or bench scraper, gently swirl the colors together on the sides and top to create a beautiful marbled effect. It’s going to look fantastic!
6. Decorate the Cake:
Time to add some extra flair! Pipe swirls or rosettes of plain white buttercream around the top edge using a star tip for a lovely finish. Place your mini pastel chocolate eggs or candy eggs on top of each swirl for that festive touch. If you’re feeling extra creative, you can scatter some more eggs around the cake stand!
7. Serve:
Finally, slice into your delightful Swirled Easter Cake to reveal the colorful, confetti-style interior. Enjoy the smiles and excitement it brings to your celebration!
Can I Use Different Sized Cake Pans?
Absolutely! If you’re using a different size pan, just keep an eye on the baking time. Smaller pans will bake faster, while larger ones may take longer. Use the toothpick test to check for doneness!
Can I Freeze the Cake?
Yes, you can freeze the cake! Allow it to cool completely, then wrap it tightly in plastic wrap or aluminum foil. It will keep well for up to 3 months in the freezer. Just thaw it in the fridge overnight before frosting and serving.
What If I Don’t Have Whole Milk?
You can substitute whole milk with any milk you have on hand, like 2% or almond milk. Keep in mind, though, that it might alter the richness slightly, but your cake will still be delicious!
How Can I Make the Buttercream Frosting More Fluffy?
If you want an even fluffier buttercream, make sure to beat the butter well initially and gradually incorporate the powdered sugar. Adding a little extra cream or milk (1-2 tablespoons) while beating can also help achieve a lighter texture!