Creamy churro cheesecake has a way of disappearing fast because it gives you two textures that belong together: a crisp cinnamon-sugar crust and a dense, smooth filling that slices cleanly after a good chill. The chopped churro pieces stay soft enough to eat easily, but they still bring those little pockets of fried dough richness that keep each bite from tasting flat. The chocolate drizzle on top is not decoration for the sake of it. It ties the whole dessert back to the churro stand idea in a way that feels familiar the second you taste it.
The trick here is balance. Cinnamon and nutmeg go into the batter, but the crust does the heavier lifting on spice, so the filling stays creamy instead of tasting like a holiday candle. Folding the churro pieces in at the end keeps them from breaking down too much, and the swirl of dulce de leche in the middle gives the cheesecake a caramel ribbon without making the center heavy or wet. If you’ve ever had a cheesecake that baked up dense but bland, this version fixes that problem without adding extra fuss.
Below, I’ll show you where the churro pieces belong, why the center should still wobble when it comes out of the oven, and how to keep the crust from turning greasy. That little bit of timing matters more than almost anything else here.
The cheesecake baked up smooth with no cracks, and the churro pieces stayed soft instead of turning soggy. The dulce de leche swirl in the middle was the part everyone asked about.
Churro cheesecake layers cinnamon, dulce de leche, and chocolate in one creamy slice worth saving for when you want a dessert that actually tastes as good as it looks.
The Reason Cheesecake Cracks When Churros Are Mixed In Too Early
A lot of churro-style cheesecakes go wrong because the batter gets overworked once the eggs go in. That whips in too much air, and the cake rises fast in the oven before collapsing as it cools. The other problem is churro pieces that are too big or too wet, which sink and leave the middle uneven instead of giving you little bites of texture throughout.
This version keeps the batter stable by beating the eggs on low speed and stopping as soon as they disappear. That matters more than a perfectly fluffy batter. You want a dense, smooth filling with just enough lift to bake through without puffing and cracking.
- Cream cheese — Full-fat blocks work best because they melt into a smooth batter without turning loose. Softened cream cheese is nonnegotiable here; if it’s cold, you’ll chase lumps forever and overmix the filling trying to fix them.
- Sour cream — This keeps the cheesecake creamy and adds a faint tang that keeps the dessert from eating like pure sugar. Plain Greek yogurt can stand in, but the finish will be a little sharper and slightly less rich.
- Churros — Fresh churros give the best flavor, but store-bought ones work fine as long as they’re chopped into small pieces. Larger chunks can sink or create wet pockets; bite-size pieces distribute better and keep the texture even.
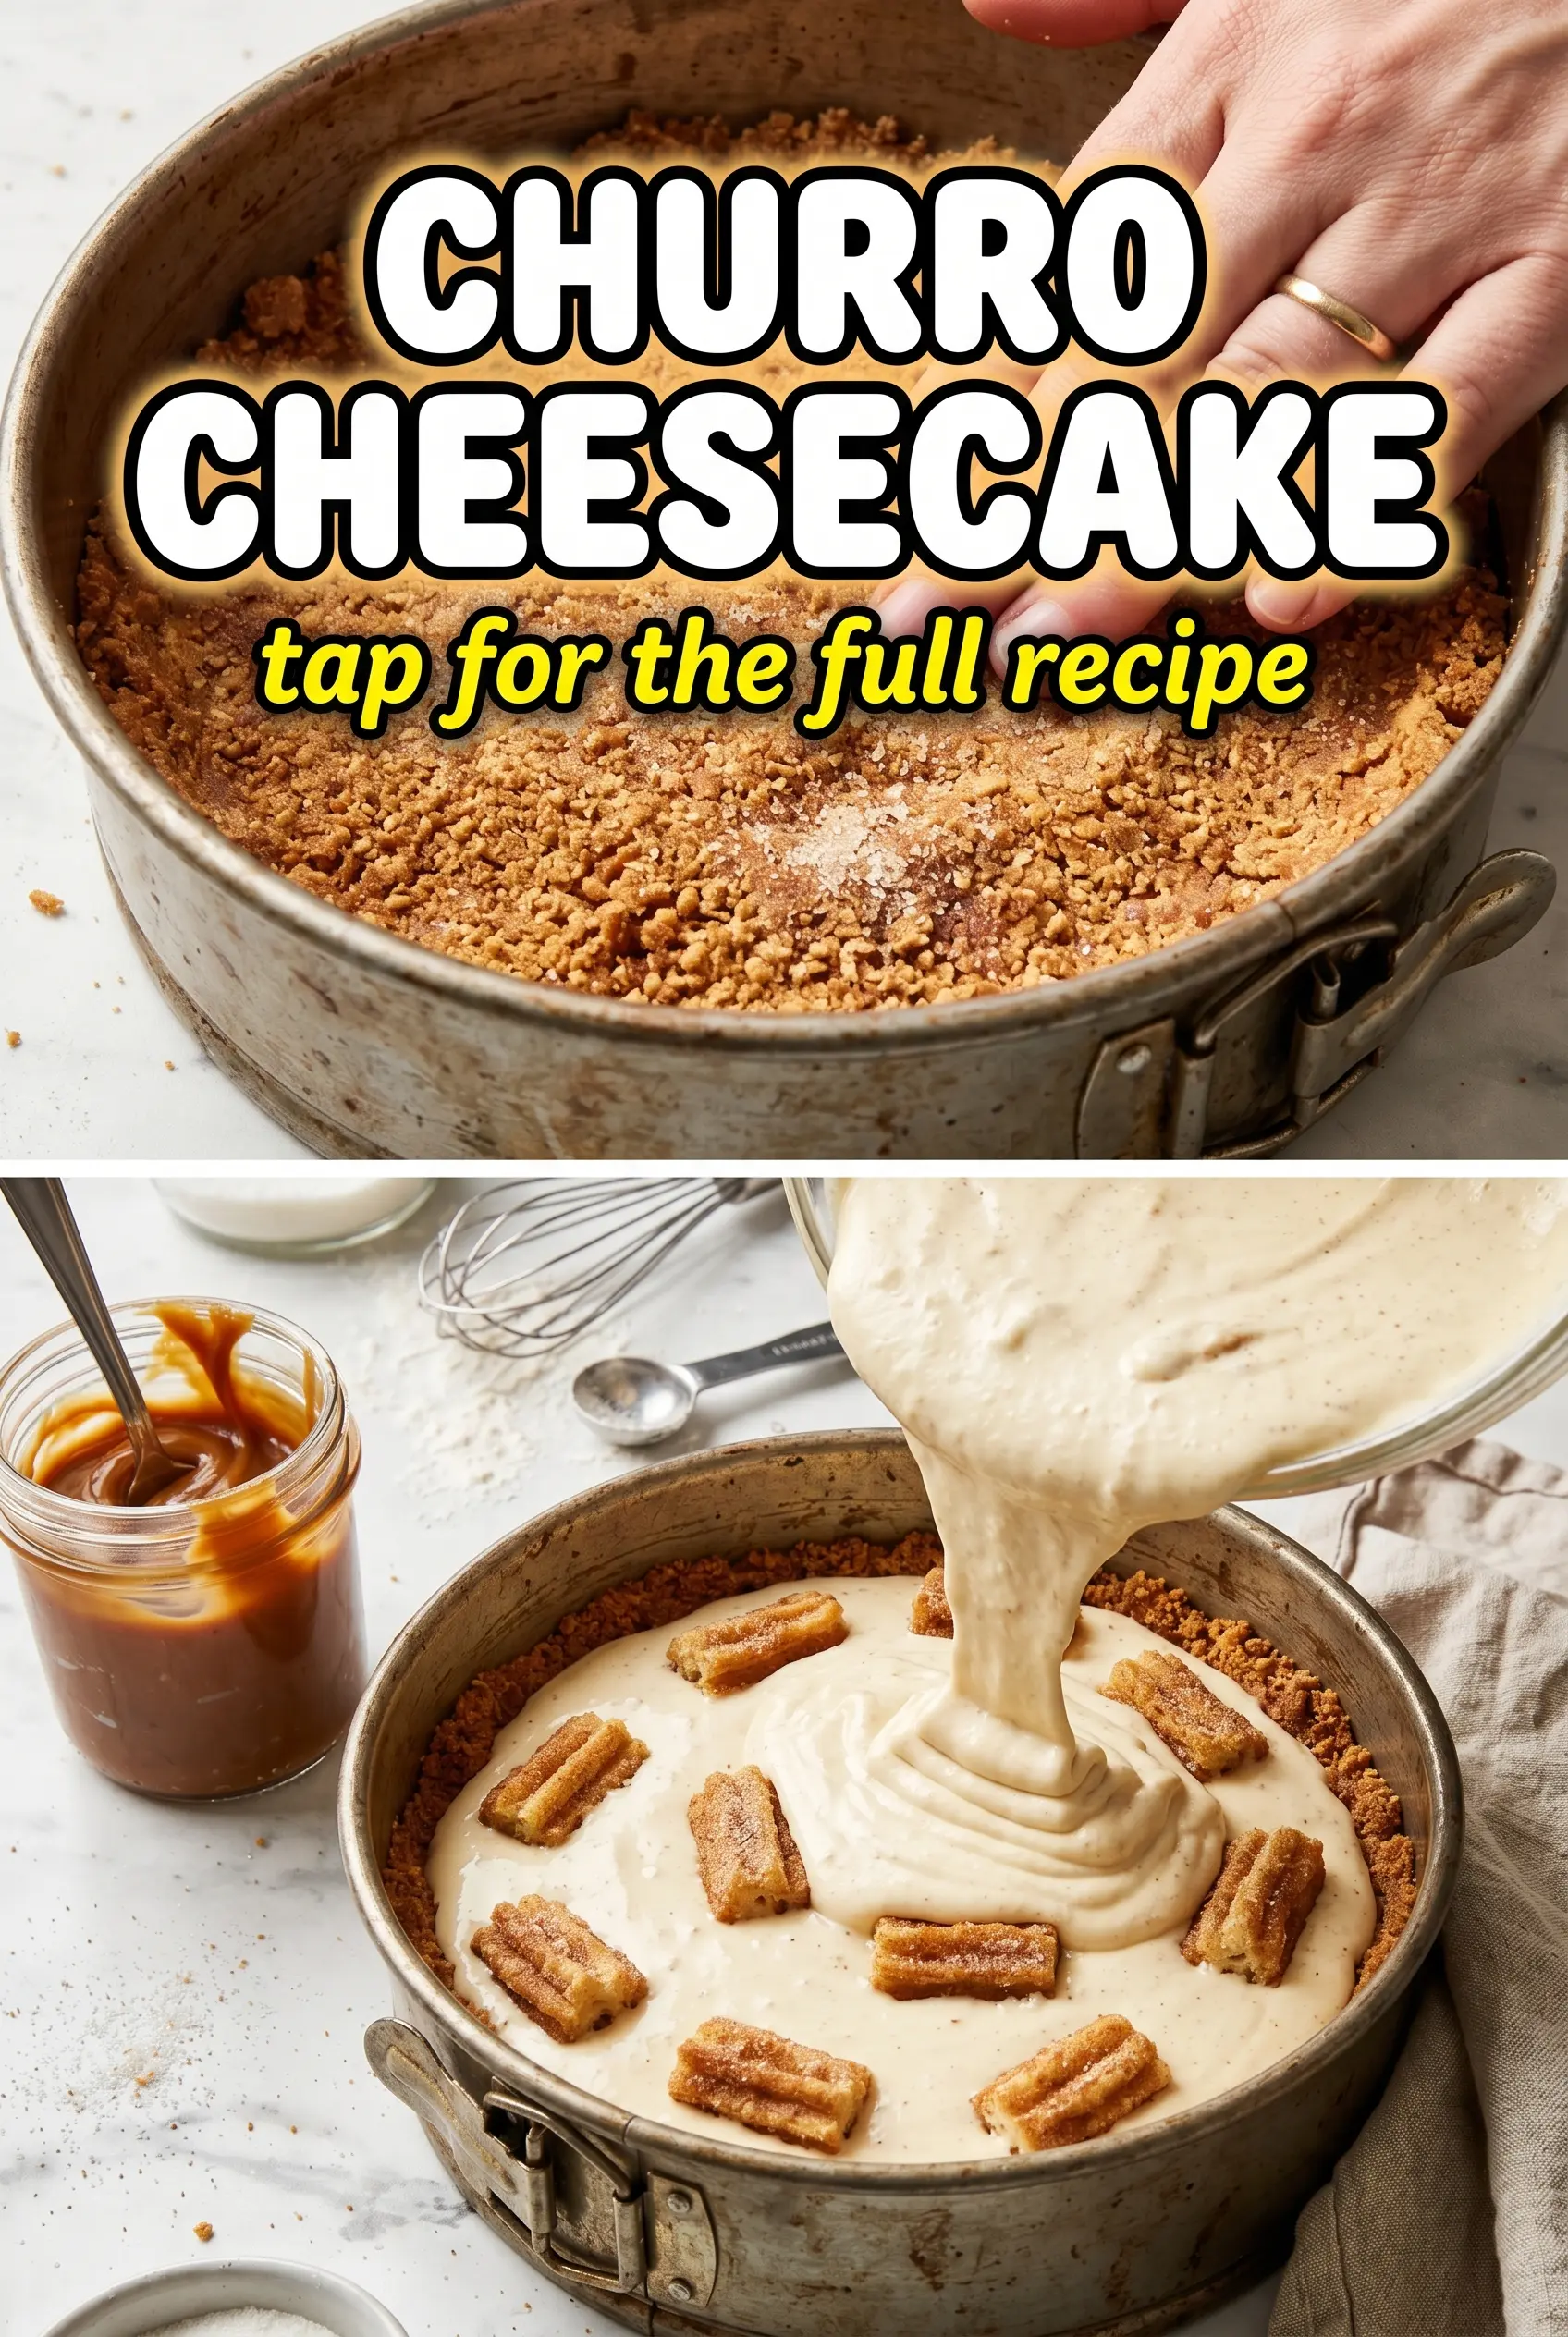
- Dulce de leche — This is the caramel layer that makes the center taste like a proper churro dessert. Warm it just enough to swirl easily; if it’s too cold, it will drag through the batter instead of ribboning through it.
Building the Filling So It Stays Smooth, Not Heavy
Pressing and Prebaking the Crust
Mix the cinnamon-sugar graham crumbs with melted butter until every crumb looks evenly moistened, then press them firmly into the bottom of the springform pan. The crust should feel compact, not loose or sandy. Bake it for 8 minutes just until it smells toasted and the edges deepen slightly. That short bake sets the base so it doesn’t turn soggy once the filling goes in.
Mixing the Cheesecake Without Whipping Air Into It
Beat the cream cheese and sugar first until the mixture looks completely smooth and glossy, with no little white specks left behind. Add the sour cream, vanilla, cinnamon, and nutmeg before the eggs so the batter is fully flavored and already loosened a bit. Once the eggs go in, keep the mixer on low and stop as soon as each one disappears. If the batter looks airy or fluffy, it will rise and fall too much in the oven.
Layering the Churro Pieces and Dulce de Leche
Fold the chopped churro pieces in gently so they don’t break apart into crumbs. Pour in half the batter, drizzle the dulce de leche over the surface in a loose swirl, then cover it with the remaining batter. That middle layer should stay marbled, not fully mixed in. If you stir it through the whole bowl, the caramel flavor gets lost and the center loses that distinct ribbon.
Baking Until the Center Still Moves
Bake until the outside is set and the center gives a slow, slight jiggle when you nudge the pan. If the whole surface is firm, it’s already gone too far and the cheesecake will dry out as it cools. Let it cool completely before refrigerating, because hot cheesecake pushed straight into the fridge tends to crack from the temperature shock. After at least 4 hours of chilling, the slices will cut cleanly and hold their shape.
How to Adapt This When You Want More Crunch, Less Sugar, or a Dairy-Free Version
For a stronger churro crunch
Use churros that are a little day-old instead of fresh. They hold their shape better in the batter and give you more defined bites instead of soft pockets. Chop them small, though, or they can sink and make the layers uneven.
For a lighter sweetness
Cut the granulated sugar back slightly and use a thinner drizzle of chocolate sauce at the end. The cheesecake still tastes rich because of the cream cheese, dulce de leche, and churro pieces. Don’t cut the sugar too hard, though, or the texture can taste flat instead of balanced.
For a gluten-free version
Swap in gluten-free cinnamon graham crumbs for the crust and use gluten-free churros if you can find them. The cheesecake filling itself is already gluten-free, so the main job is keeping the crust and mix-ins safe. The texture stays close to the original as long as the crumbs are pressed firmly and prebaked.
For a dairy-free version
Use a dairy-free cream cheese and a coconut-based sour cream substitute, but expect a softer set and a slightly different tang. This version still works, but it won’t slice quite as firmly as the original. Chill it overnight if you want the cleanest cuts.
Storage and Reheating
- Refrigerator: Store covered for up to 5 days. The crust softens a little after day one, but the flavor stays strong.
- Freezer: It freezes well in slices. Wrap tightly and freeze without the chocolate sauce, then thaw overnight in the refrigerator for the best texture.
- Reheating: Don’t reheat this one. Cheesecake is meant to be served chilled, and warming it softens the center too much and turns the crust oily.
Questions I Get Asked About This Recipe
Churro Cheesecake
Ingredients
Equipment
Method
- Preheat the oven to 325°F. Mix cinnamon sugar graham cracker crumbs with melted butter and press into the bottom of a 9-inch springform pan.
- Bake the crust for 8 minutes at 325°F, then let it cool slightly. Look for a set, lightly fragrant crust that holds together when touched.
- Beat cream cheese and granulated sugar until smooth. Use a steady, even beat so there are no visible cream cheese lumps.
- Add sour cream, vanilla extract, cinnamon, and nutmeg, then beat until combined. The mixture should look creamy and uniform.
- Add eggs one at a time, beating on low speed after each addition. Stop when each egg is fully incorporated and the batter looks glossy.
- Fold in chopped churros. Keep folding just until the pieces are evenly distributed.
- Pour half the cheesecake batter over the crust. Spread gently so the surface is even.
- Drizzle dulce de leche over the batter in a swirl pattern, then top with remaining batter. The swirl should show through as ribbons.
- Bake at 325°F for 40-50 minutes until the cheesecake is set but the center still jiggles slightly when gently shaken. Expect the edges to look firm and the middle to wobble like soft gelatin.
- Cool the cheesecake completely, then refrigerate for at least 4 hours. The top should be fully chilled and the slice should cut cleanly.
- Drizzle chocolate sauce before serving. Add it right before slicing so it stays glossy on the surface.